Turn your Reference List into an Thinking Partner
Turn your Reference List into an Thinking Partner

Researcher snapshot
At a glance
This guide shows you how to use Consensus Library to:
Build Collections for a class, literature review, thesis, or dissertation
Compare findings, methods, and evidence across your selected papers
Identify gaps, contradictions, and sources that support or challenge your claims
Find new research when your Collection reveals what is missing
Bring cited analysis back into your writing workflow
My Library gives you the essentials of a reference manager in Consensus. Save papers as you search, upload your own PDFs, paste in DOIs, or import your Zotero library. Then organize the sources you want to work with into Collections for a class, thesis chapter, literature review, or research project.
What sets Consensus apart is what you can do once a Collection is set up. Consensus can analyze the specific sources in that Collection, helping you see where the evidence agrees or conflicts, which populations or methods are underrepresented, what gaps are worth investigating next, and which papers genuinely support the claim you are writing.
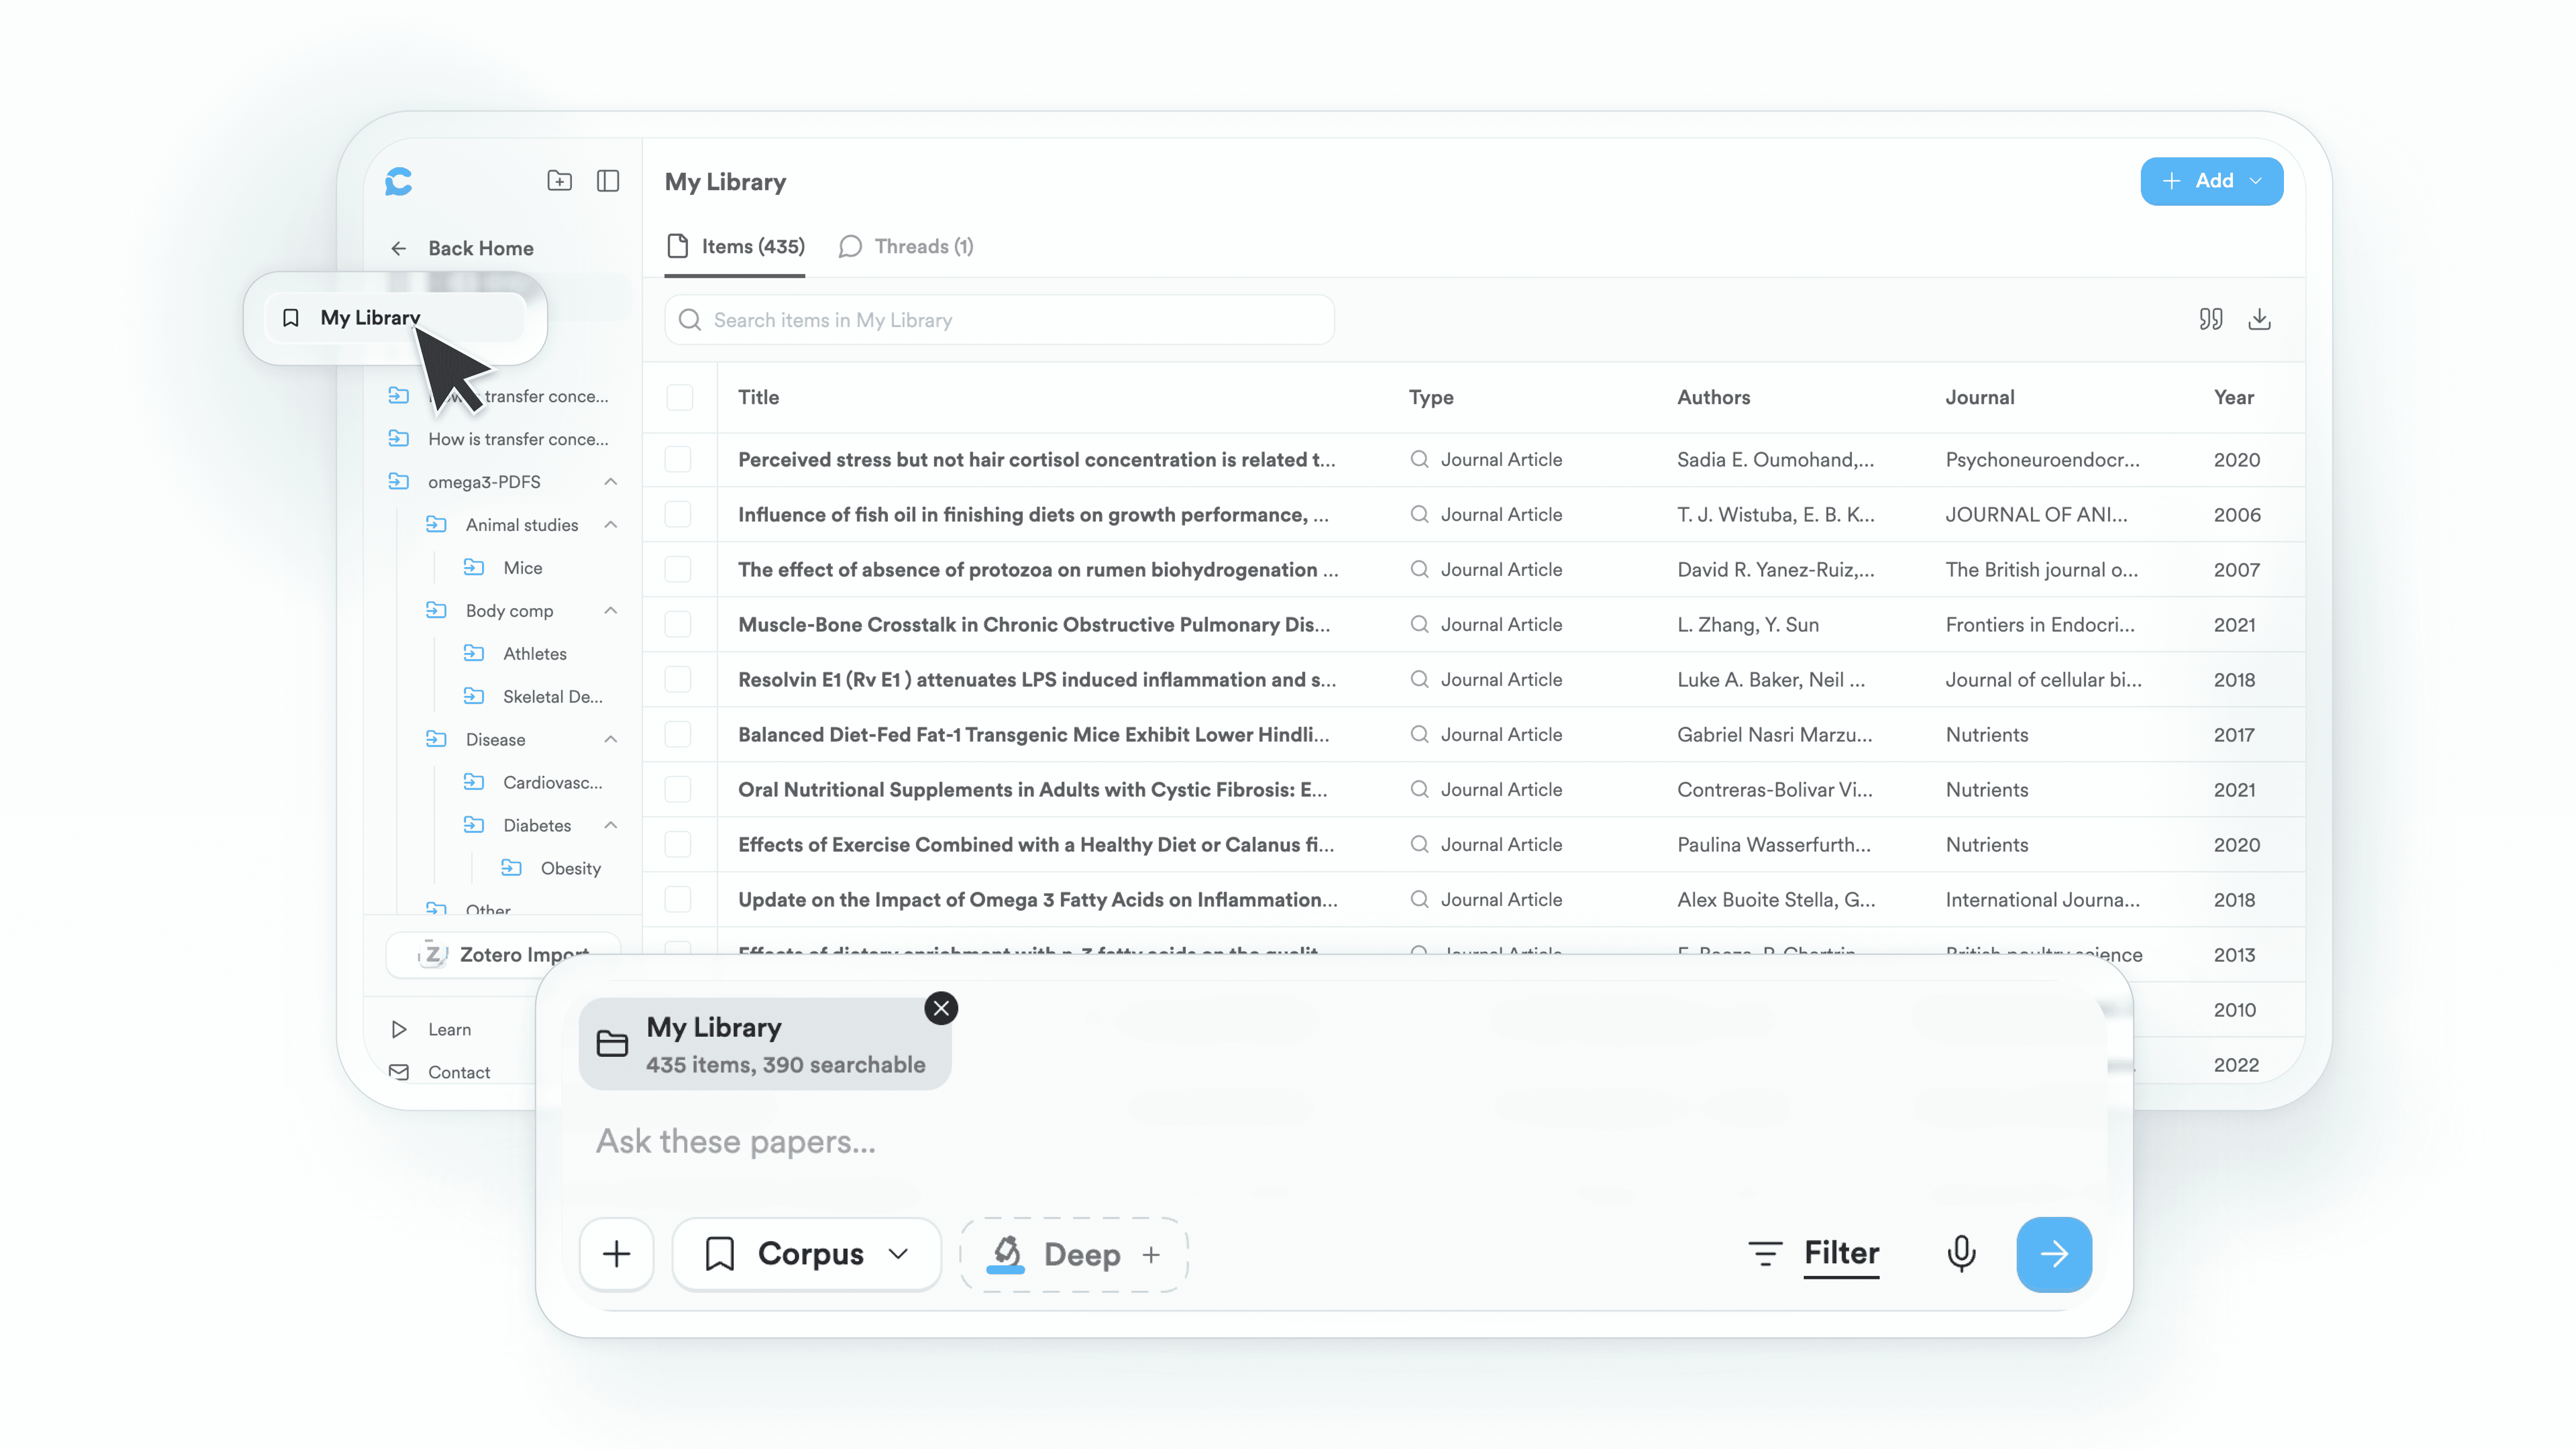
A general search in Consensus helps you discover papers across the research corpus. When you want to focus on the sources you have chosen, save them to a Collection in My Library. Consensus can then search and answer from that curated set of papers, helping you explore the evidence you want to work with rather than the entire research corpus.
The more deliberately you build a Collection, the more useful the analysis becomes.
🗂️ 1. Set up your first Collection
Open My Library using the bookmark icon in the left sidebar. It holds every paper, search, and document you have saved in Consensus. Keep items in My Favorites, or create Collections for individual classes, assignments, research questions, and long-term projects.
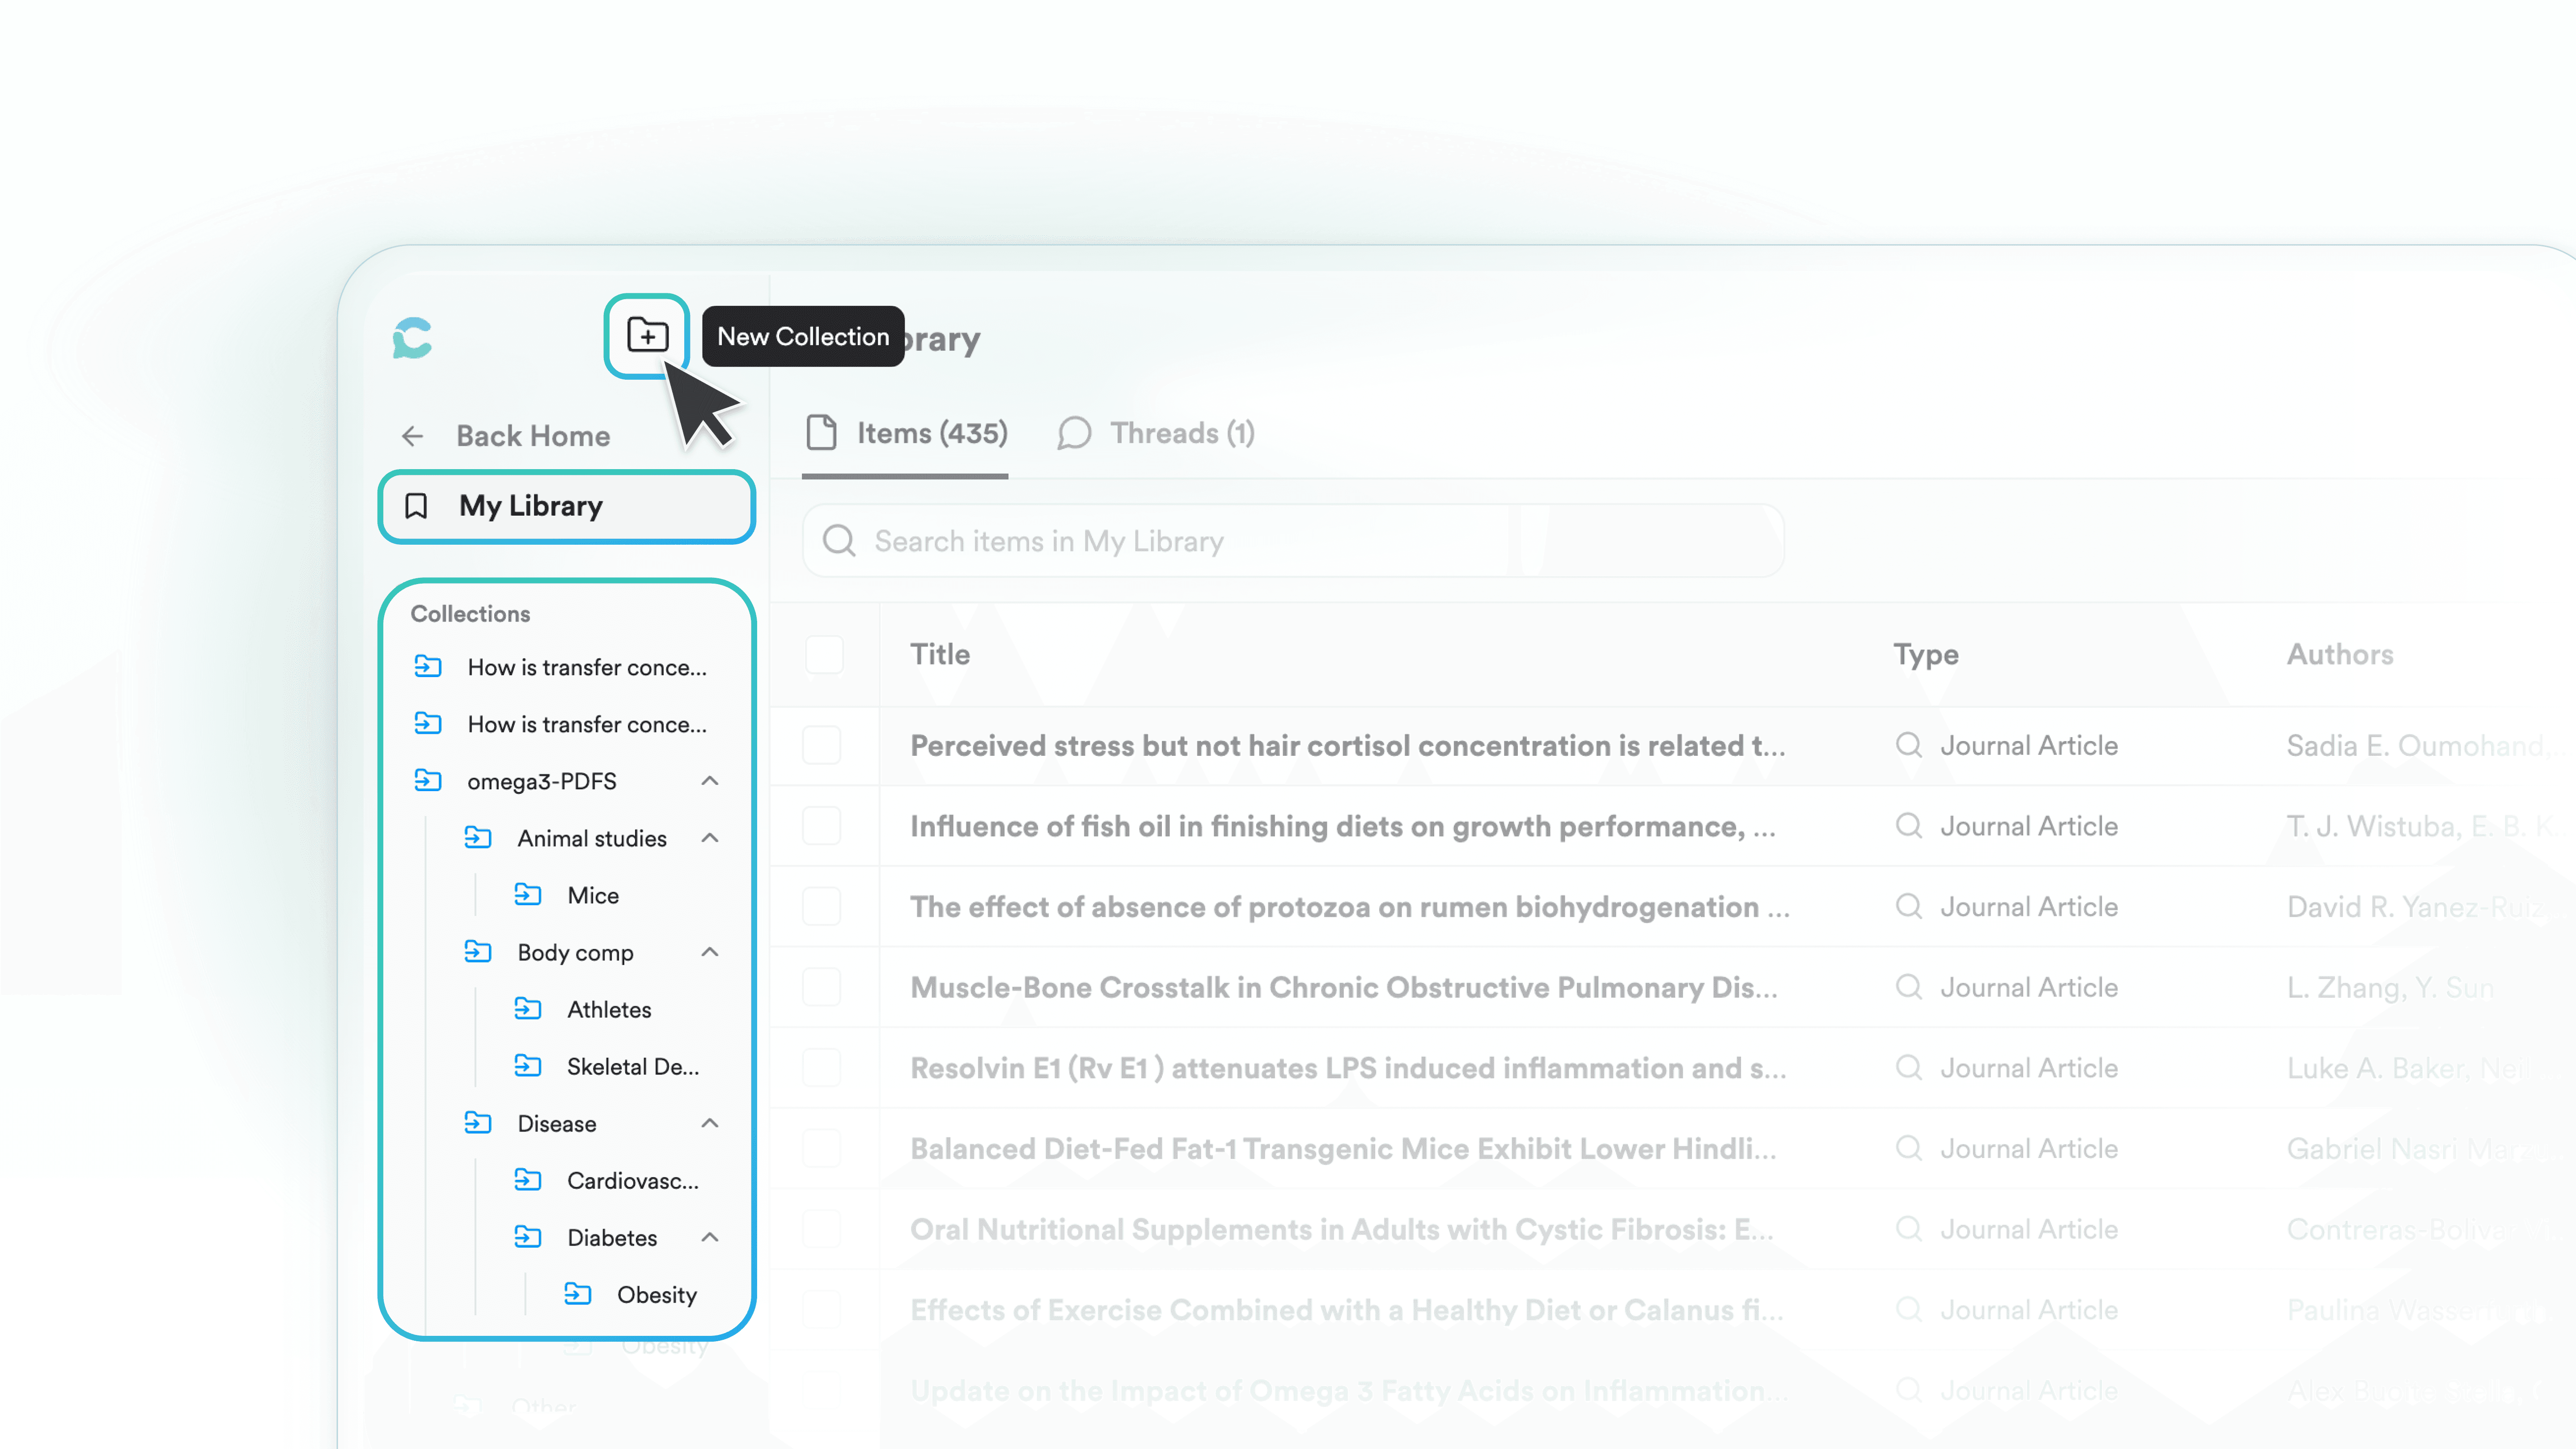
To create a Collection:
Open My Library from the left sidebar.
Click the New Collection button (the folder with a plus sign, in the upper-left corner).
Name it after your project. For example, “Thesis: Youth Mental Health,” “BIO 302 Literature Review,” or “Grant Proposal: Study Design.”
Add research to your Collection
From My Library, click Add papers in the upper-right corner to:
Upload PDFs, RIS files, or BibTeX files
Paste one or more DOIs
Import papers and folders from Zotero
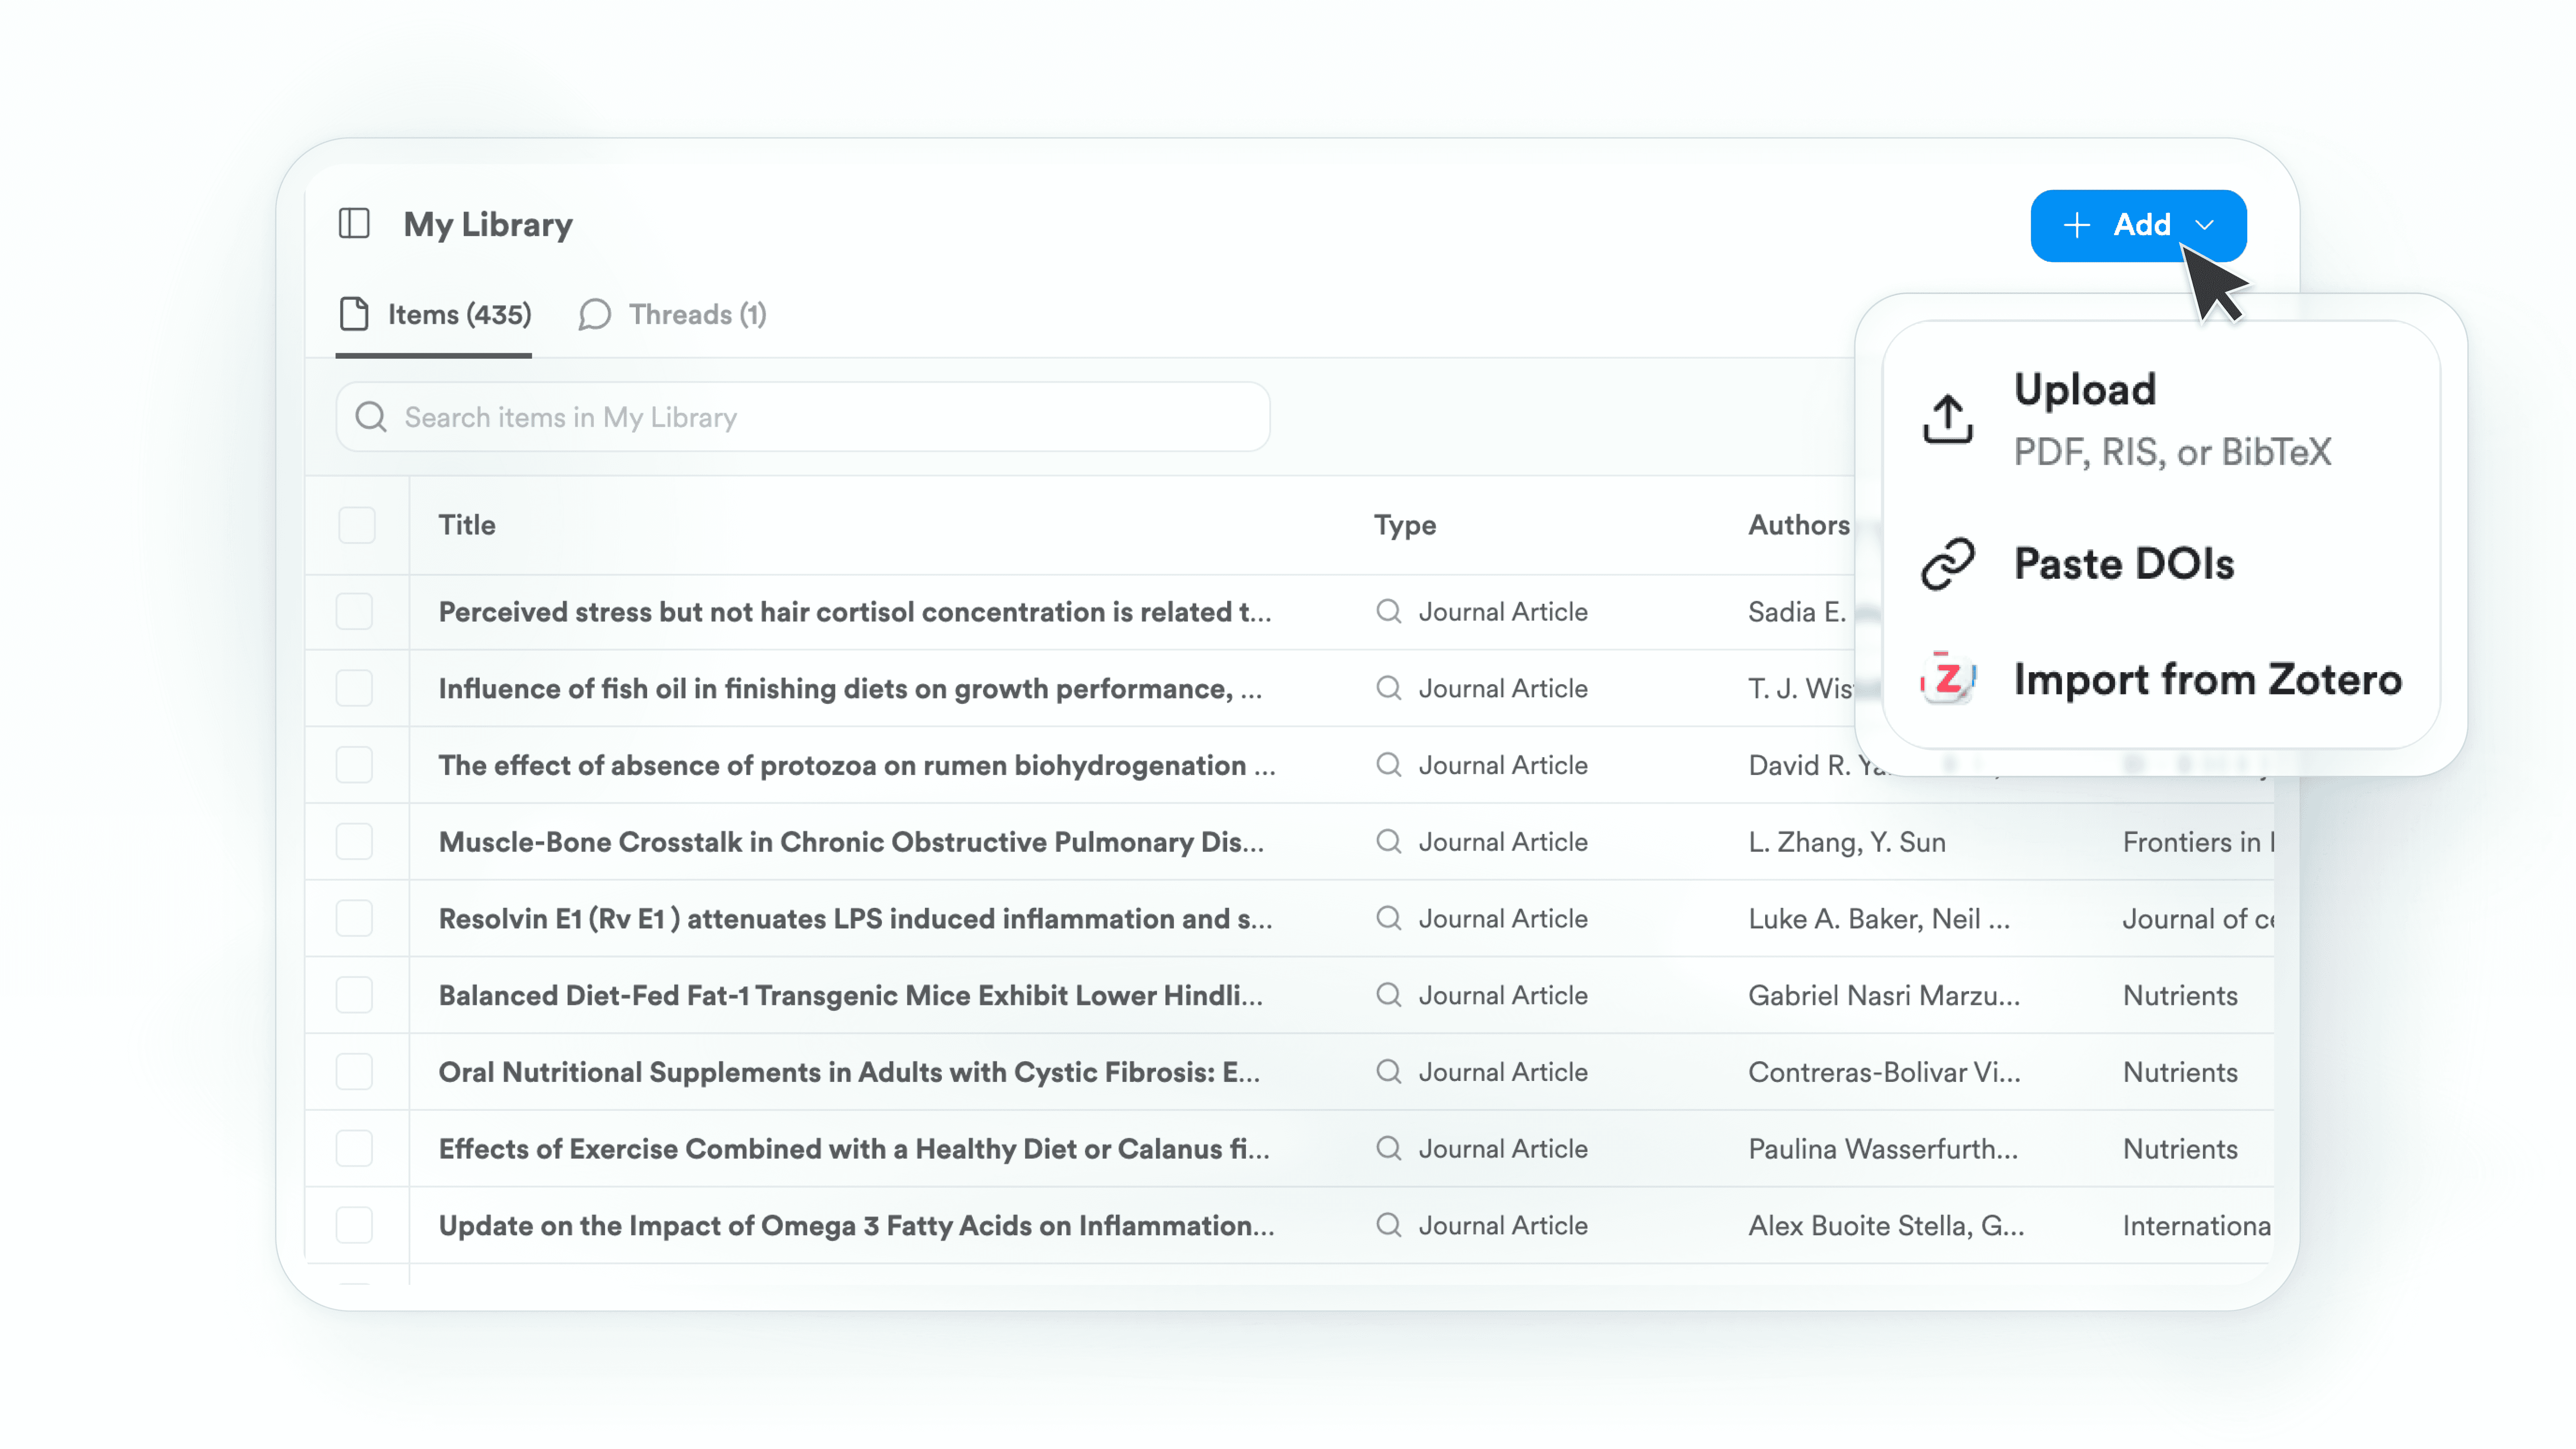
If you already work in Zotero, import your Zotero library into Consensus. Your folders and subfolders arrive as connected Collections.
You can also upload your own manuscripts, dissertations, proposals, clinical protocols, and unpublished reports alongside published papers. These stay private unless you share the Collection they’re in.
You can also save research while searching:
Run a search.
Click the bookmark icon on a paper to save that paper.
Or, click the bookmark at the top of the results page to save the entire search.
Select an existing Collection or create a new one.
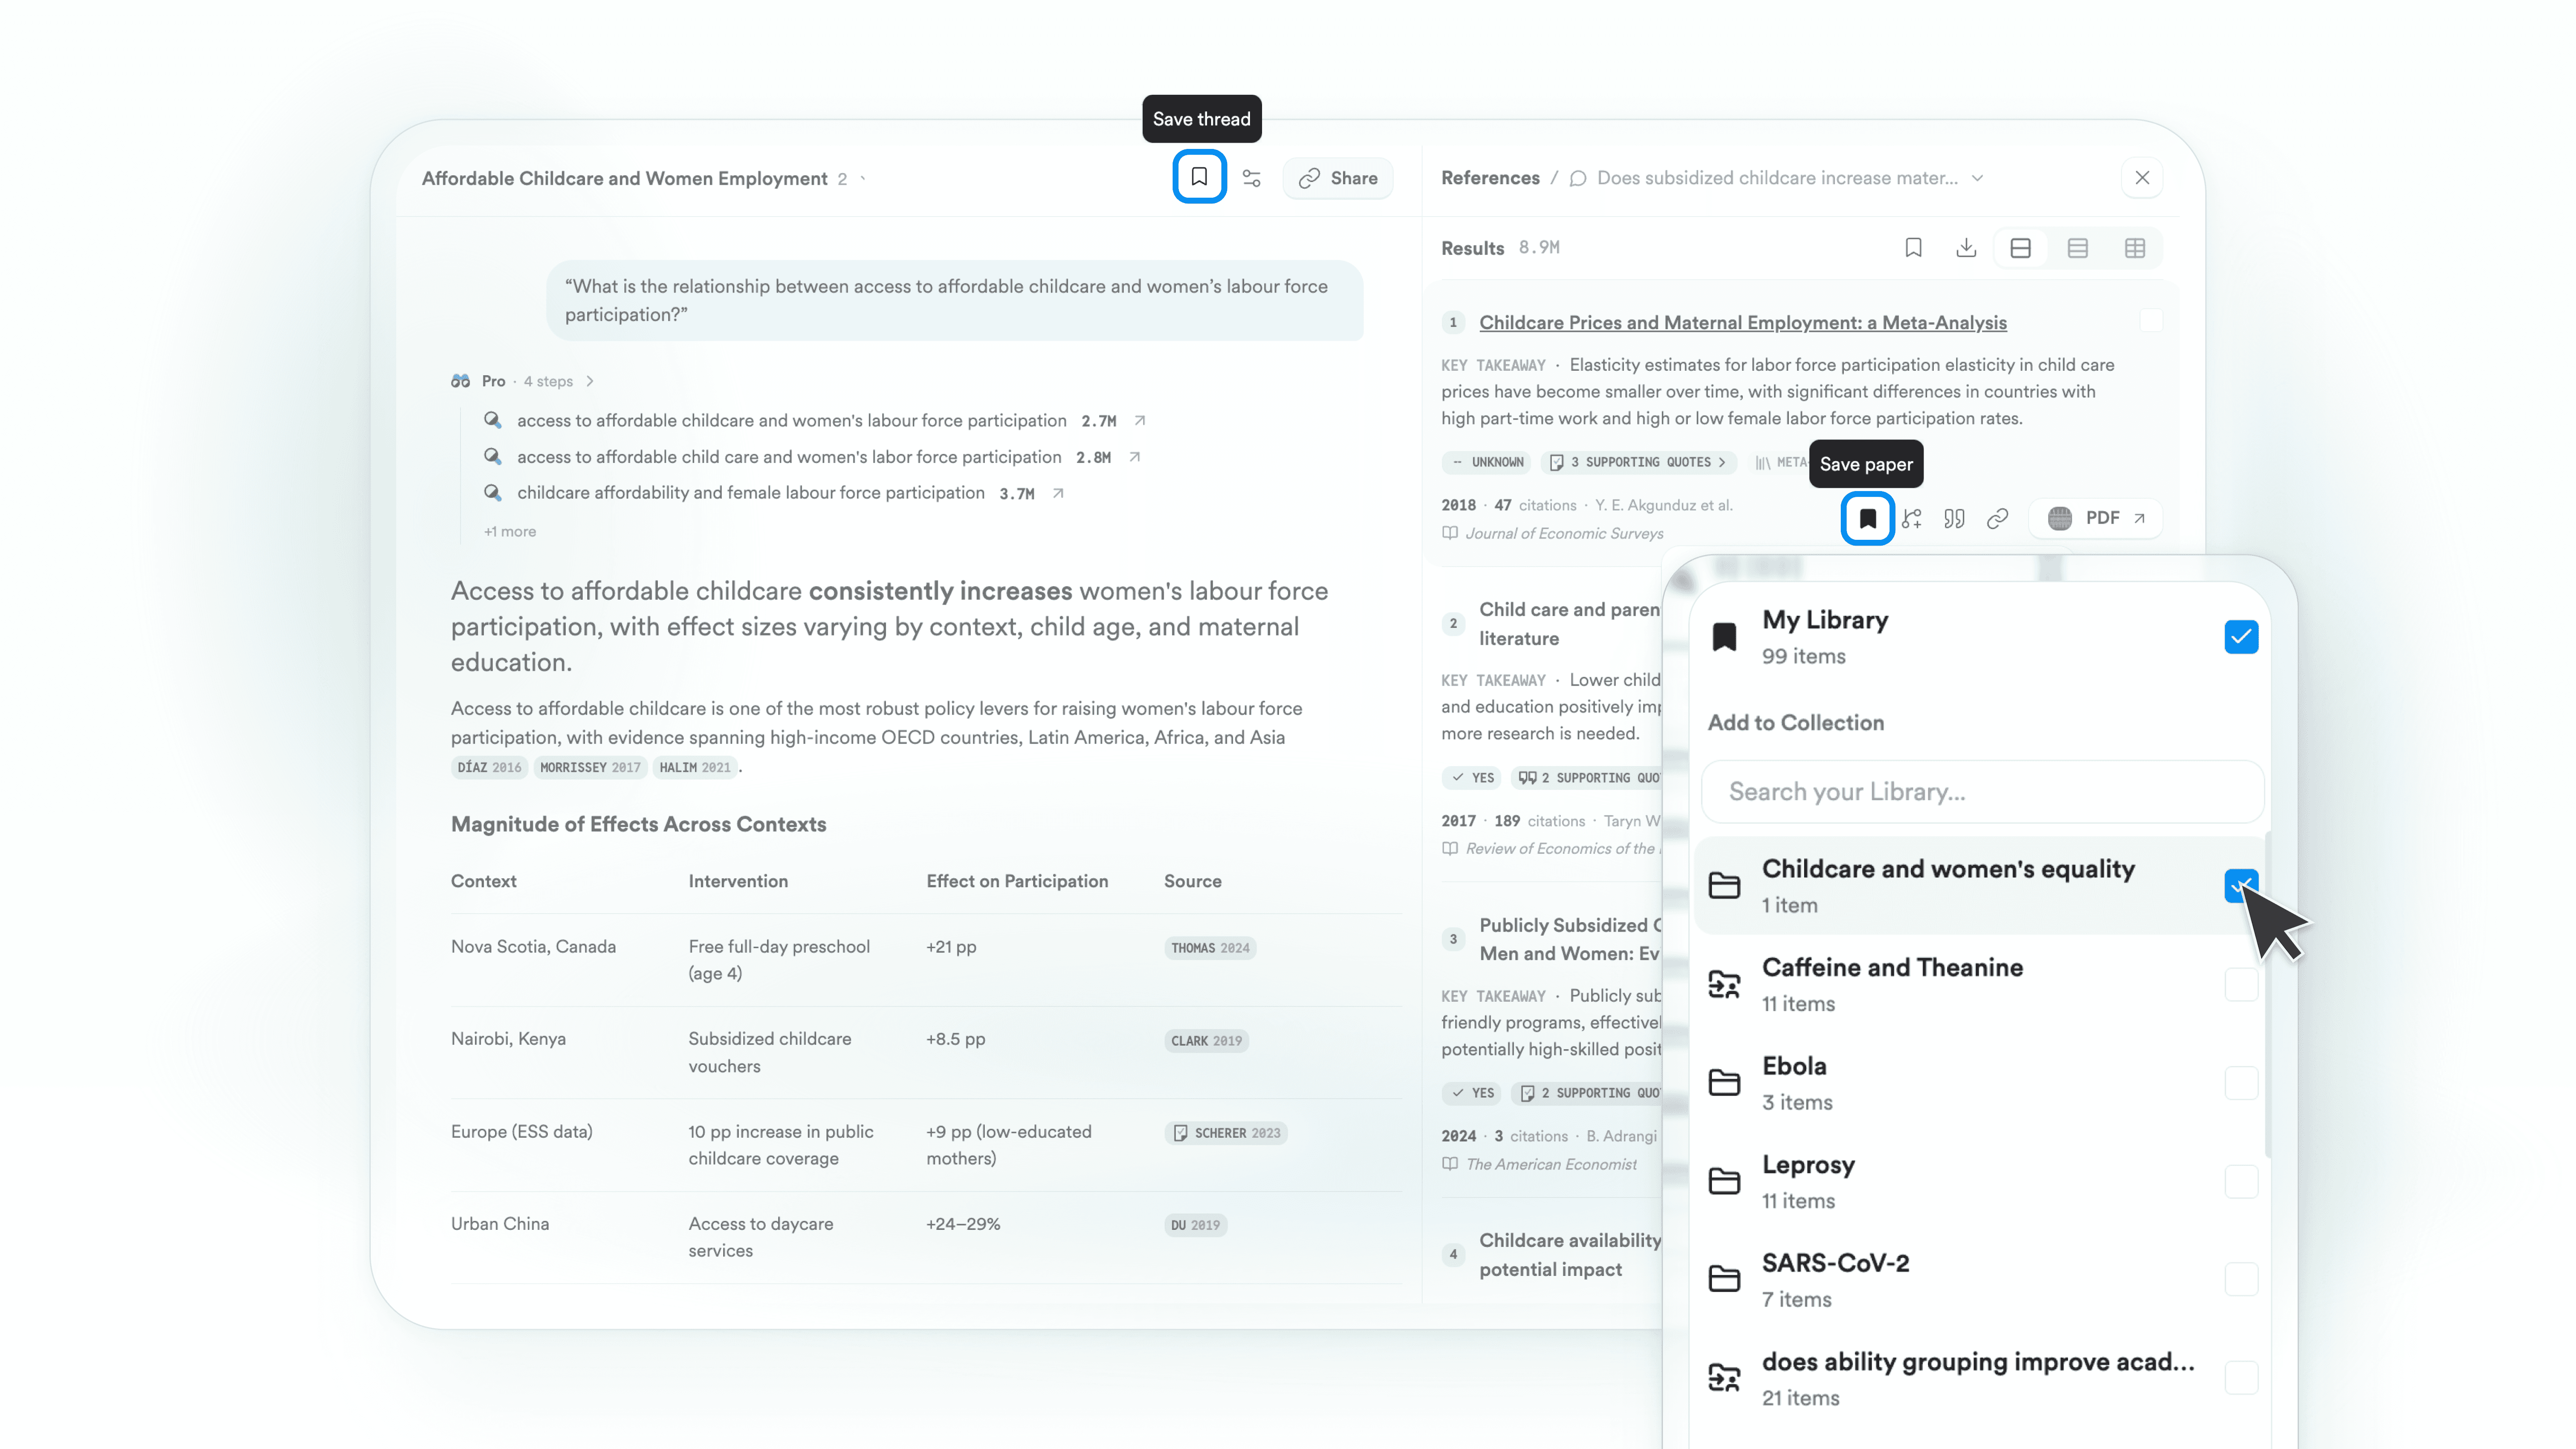
For more setup detail, see My Library: How to Save Papers and Searches.
🧭 2. Organize your first project
Start with the one project you’re most focused on this semester. Create a Collection for it, then add subcollections as you need them.
Think of each Collection as the working bibliography for a specific output: a course paper, thesis chapter, manuscript, grant, or research project.

For example, if you are writing a literature review, you might create:
BIO 302 Literature Review
Core papers
Read next
Methods
As the project grows, add subcollections when they help you separate papers you want to return to or analyze together in Collection Chat.
For a larger project, you can also nest more focused subcollections inside broader ones:
Thesis: Youth Mental Health
Chapter 1: School Environments
School belonging
Intervention studies
This lets you ask broad questions across the entire thesis, then narrow the analysis to one chapter, theme, method, or population.

Tips to get started (keep it simple)
Start small. 2–3 subcollections is plenty. Add another layer only when the same category keeps reappearing.
Name it for future-you. Use labels you’ll still understand months later. Add numbers when order matters (chapters, stages, studies).
Sort to scan. Sort by Title, Author, Journal, Year, Study design, or Save date (hover a column header → click the arrow).
Group with intention. Select a Collection or subcollection as your Chat source set—cluster papers you’ll want to ask questions across later.
For example, a student writing a literature review might import papers from Zotero, and organize them into Core papers, Methods, and Read next. Then, they might ask Chat to compare the studies, generate a Research Gaps Matrix, use Deep Search to investigate what is missing, and save the new papers back to the Collection.
💬 3. Ask questions across your Collection
There are two ways to start.
From My Library:
Open My Library.
Select the Collection you want to analyze.
Enter your question in the search bar at the bottom of the screen.
From a new search:
Start a new search in Consensus.
Click the dropdown labelled Corpus, then select My Library, or click the + button to select from your Collections or individual saved papers.
Enter your question.

Whatever you select becomes the source set. When you open a Collection, Consensus answers from that Collection’s papers. When you use the search bar in My Library without opening a Collection or selecting individual papers, it searches across your entire Library.
Questions to ask your Collection:
“What are the central themes across these papers?”
“Which papers should I read first?”
“Compare the populations, methods, and outcomes in these studies.”
“Where do these papers agree or disagree?”
“Which studies provide the strongest evidence?”
“Separate the foundational research from the recent developments.”
“Organize these papers by their contribution to the field.”
“Create a table comparing the study designs and findings.”
The scope of the search drives the answer. Query the full project Collection for a broad synthesis; open a subcollection when you want to focus on one chapter, method, population, or theme.
When your Collection cannot answer the question, search the broader Consensus corpus, then save what you find back to the relevant Collection.
As always, each answer remains connected to the papers behind it, so you can open the sources and verify the evidence before using it in your work. Always follow the citations and read the underlying papers before citing. Consensus helps you navigate your source set; evaluating the evidence stays your responsibility.
📊 4. Visualize gaps, developments, and relationships
Some patterns are easier to see than to read. Open the relevant Collection, select Pro or Deep search mode, and explicitly ask for one of the visualizations below.
Find under-explored areas with a Research Gaps Matrix
Use a Research Gaps Matrix to compare research volume across two dimensions: populations and outcomes, methods and topics, or interventions and settings.
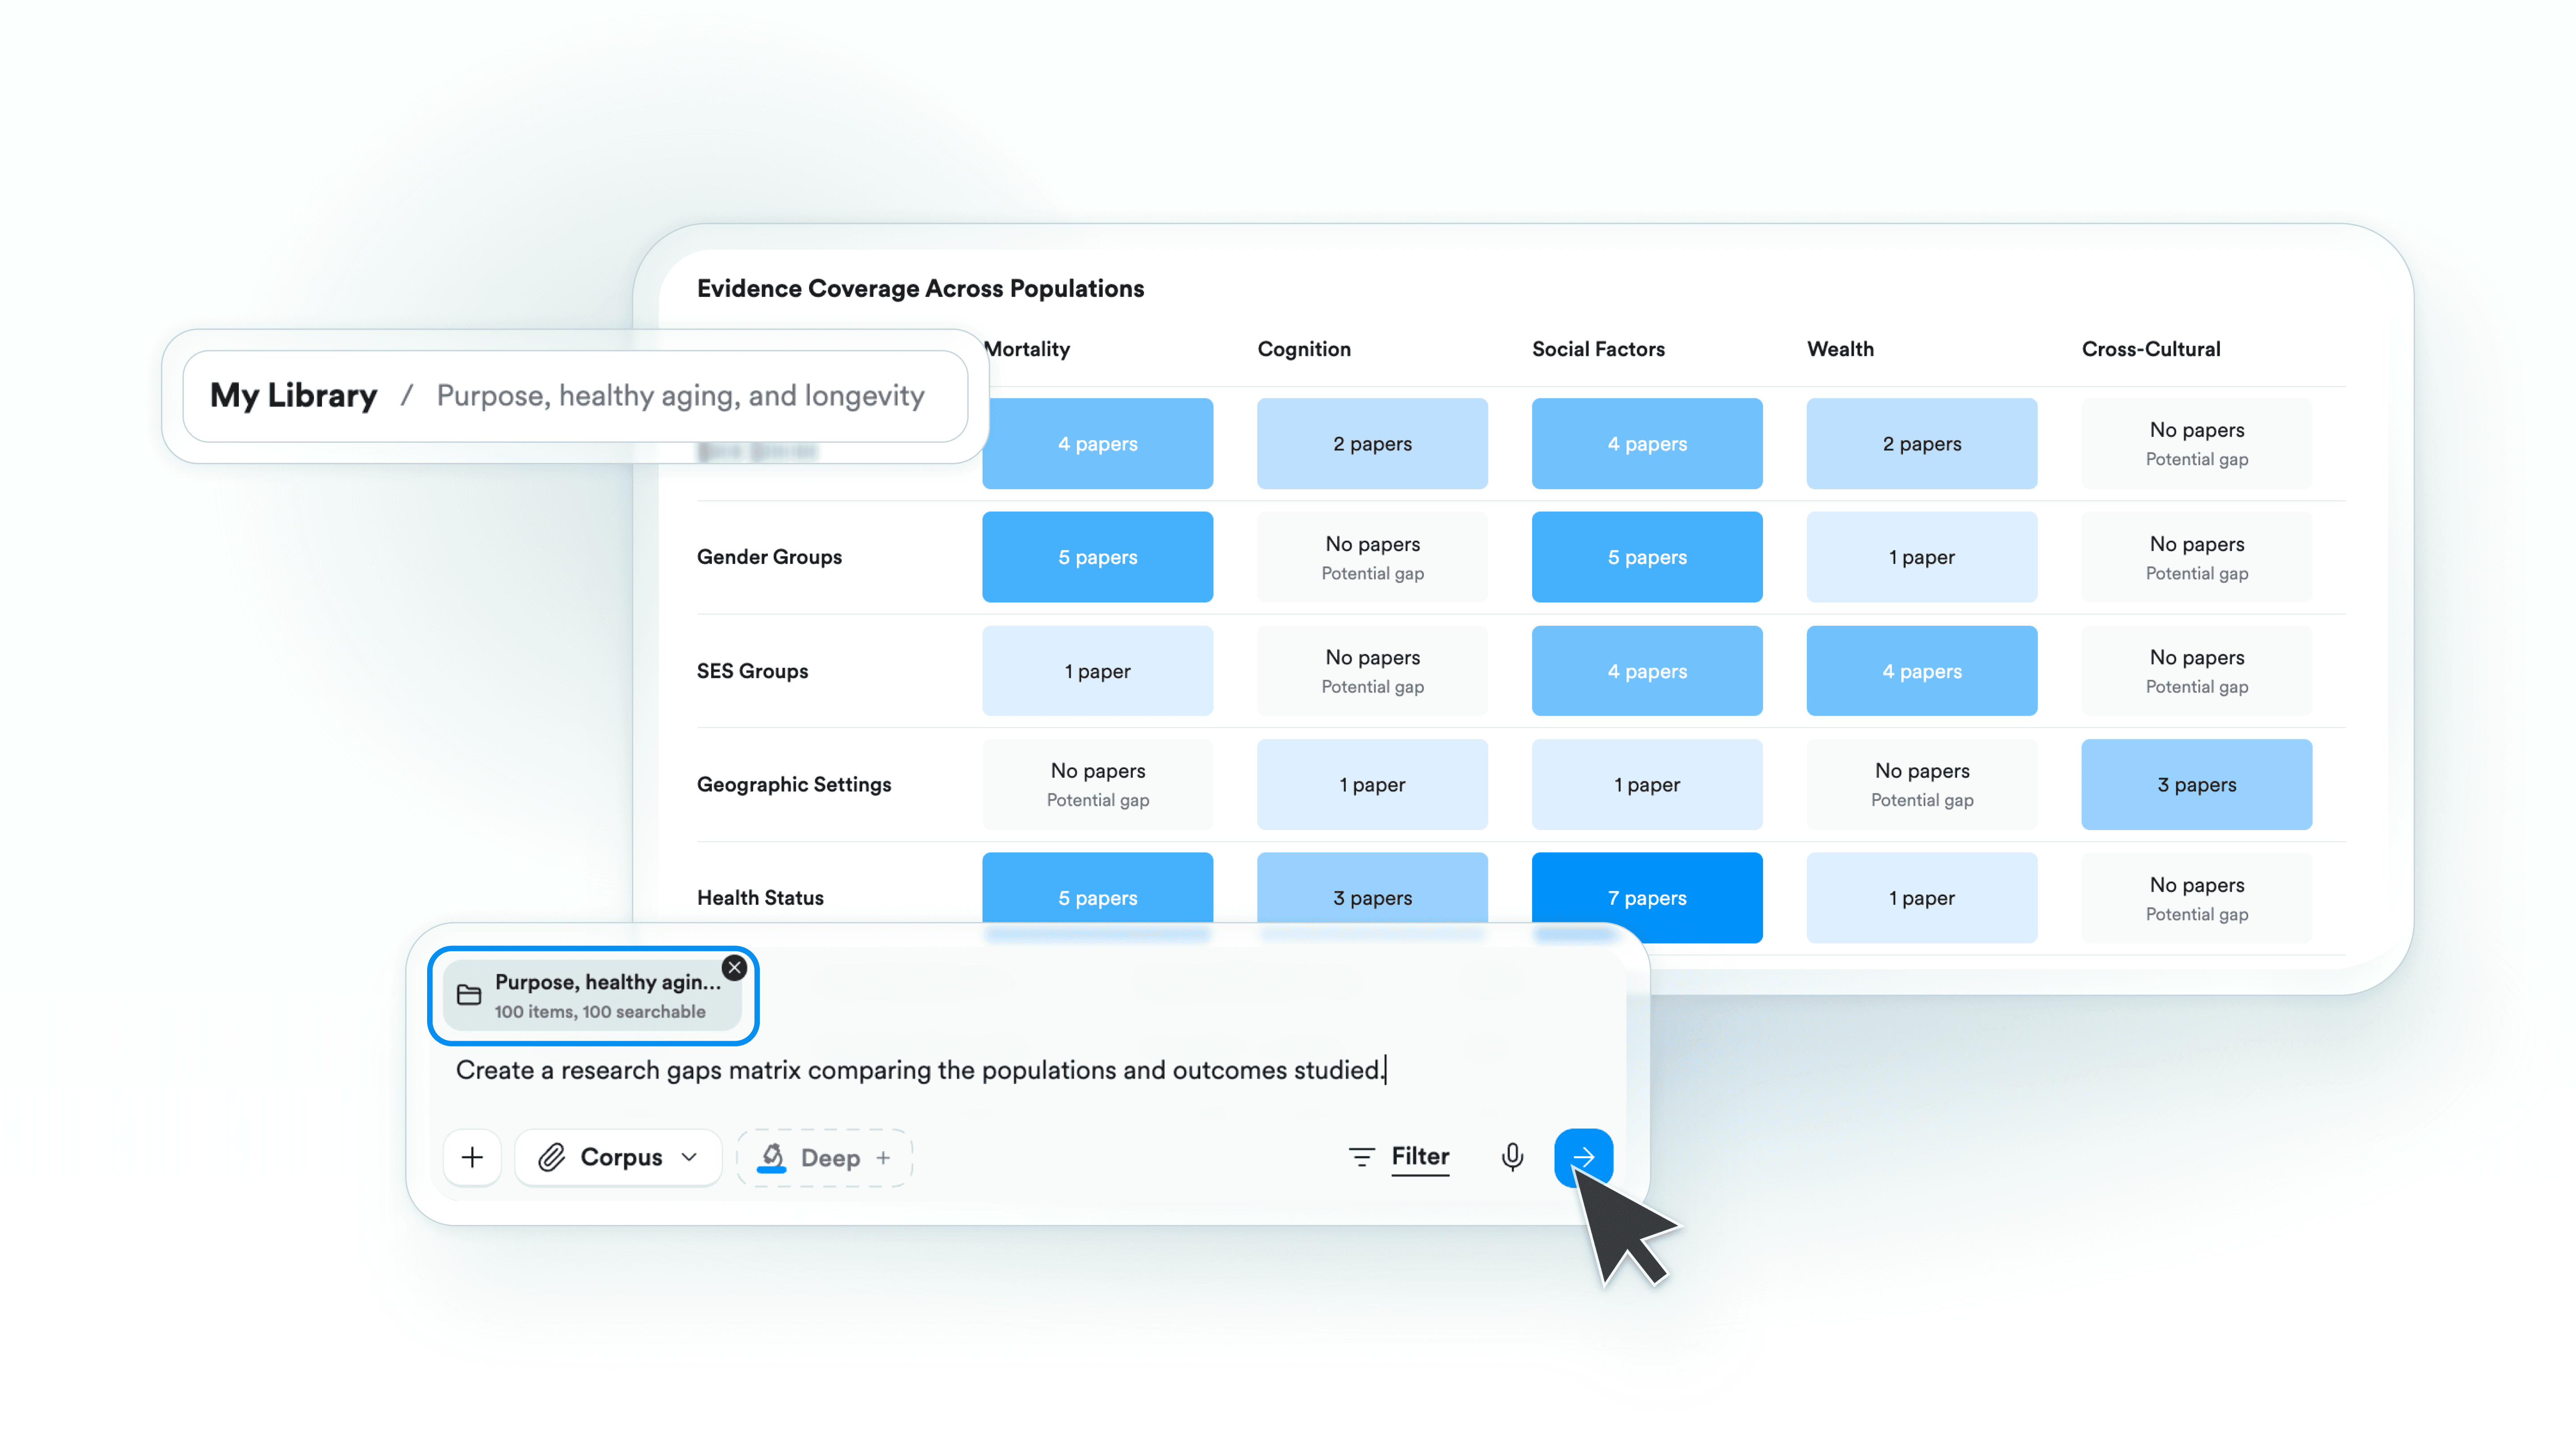
Questions to ask for a Research Gaps Matrix
“Create a research gaps matrix comparing the populations and outcomes studied.”
“Which populations are underrepresented in this research?”
“What questions remain unanswered across these studies?”
The matrix sorts papers into cells and highlights which combinations have drawn more or less attention. Hover over a cell to see the papers behind it.
A gap in your Collection is not necessarily a gap in the field. It may only reflect the searches you ran and the papers you saved. Treat the matrix as a prompt for your next search, then use Deep Search to test whether the gap holds across the broader literature.
Follow how the evidence developed with a Results Timeline
Use a Results Timeline to see how a topic, finding, or body of evidence has shifted over time.
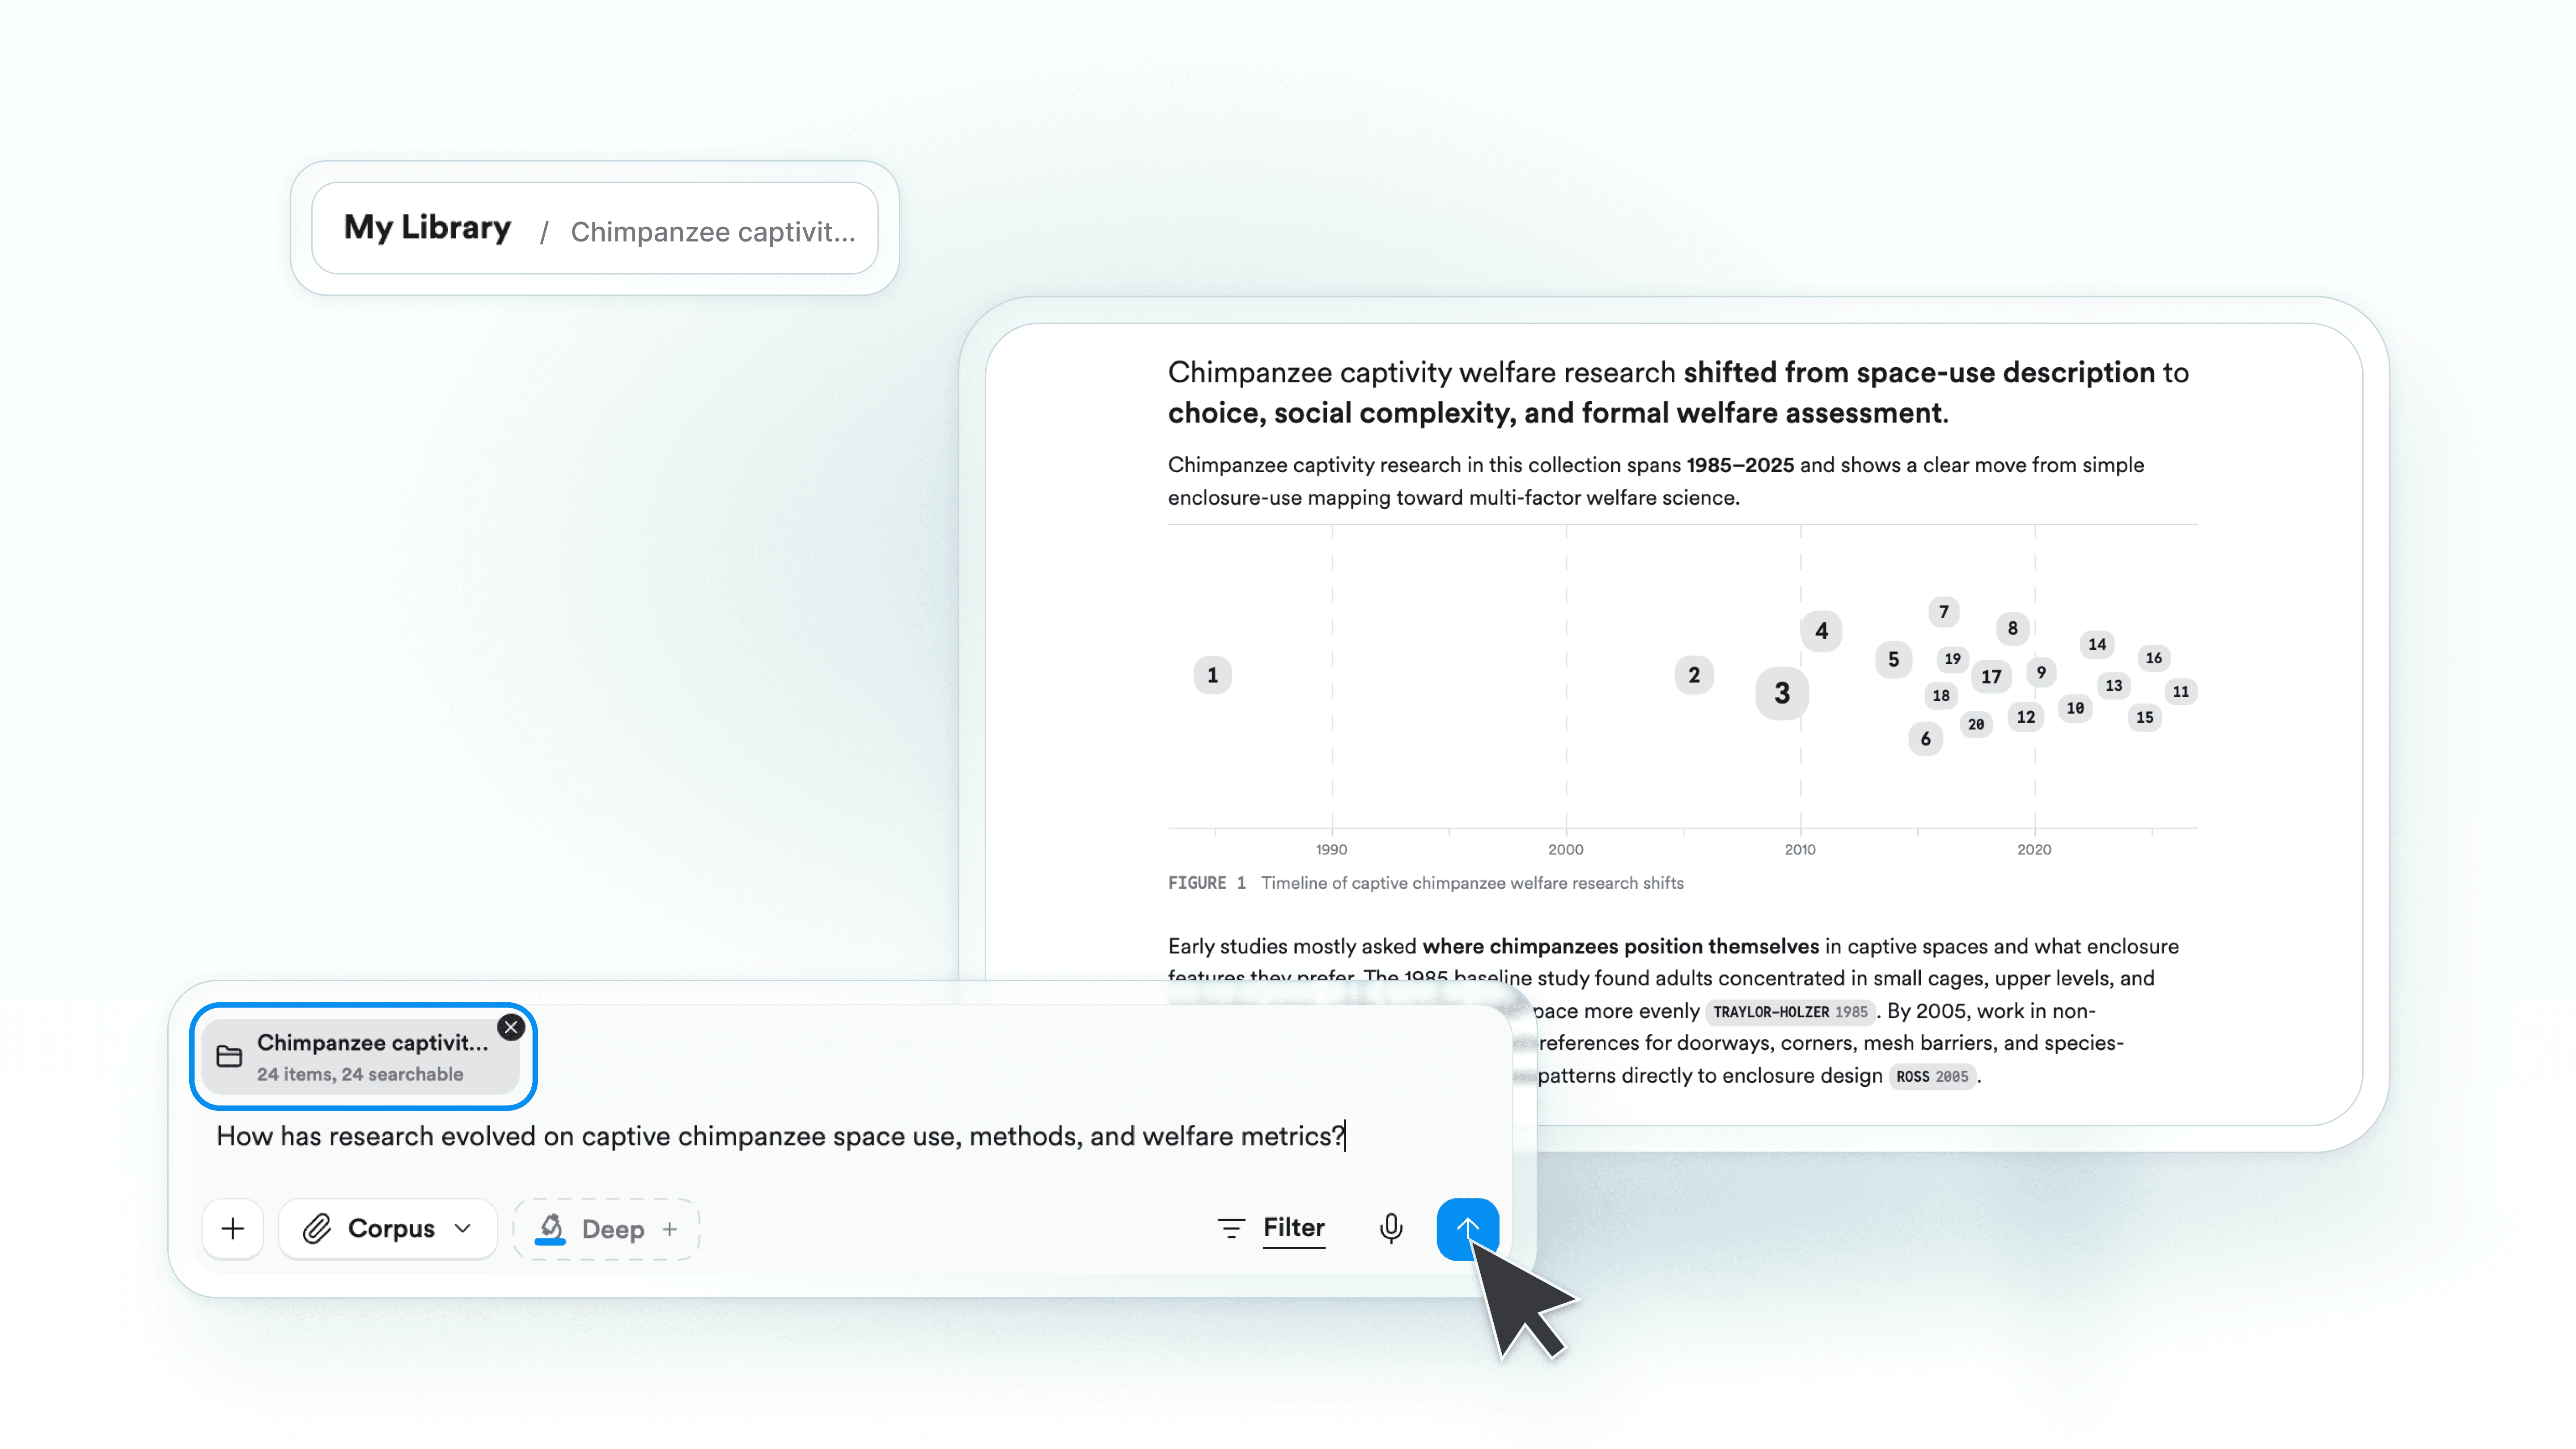
Questions to ask for a Results Timeline
“Create a timeline showing how research on this topic has developed.”
“Show the major findings in chronological order.”
“How has the scientific understanding of this question changed?”
“Place the foundational and recent studies on a timeline.”
</aside>
A timeline surfaces foundational papers, bursts of activity, and turns in the evidence. Read it as a guide for closer investigation, not a complete history.
Trace connections with Citation Graph
Citation Graph maps the research surrounding a single paper. When you find an important one, open its Citation Graph to:
Move backward to foundational work
Find later studies that cited, tested, or extended the paper
Discover related papers and research clusters
Trace how an idea developed
Identify perspectives missing from your Collection
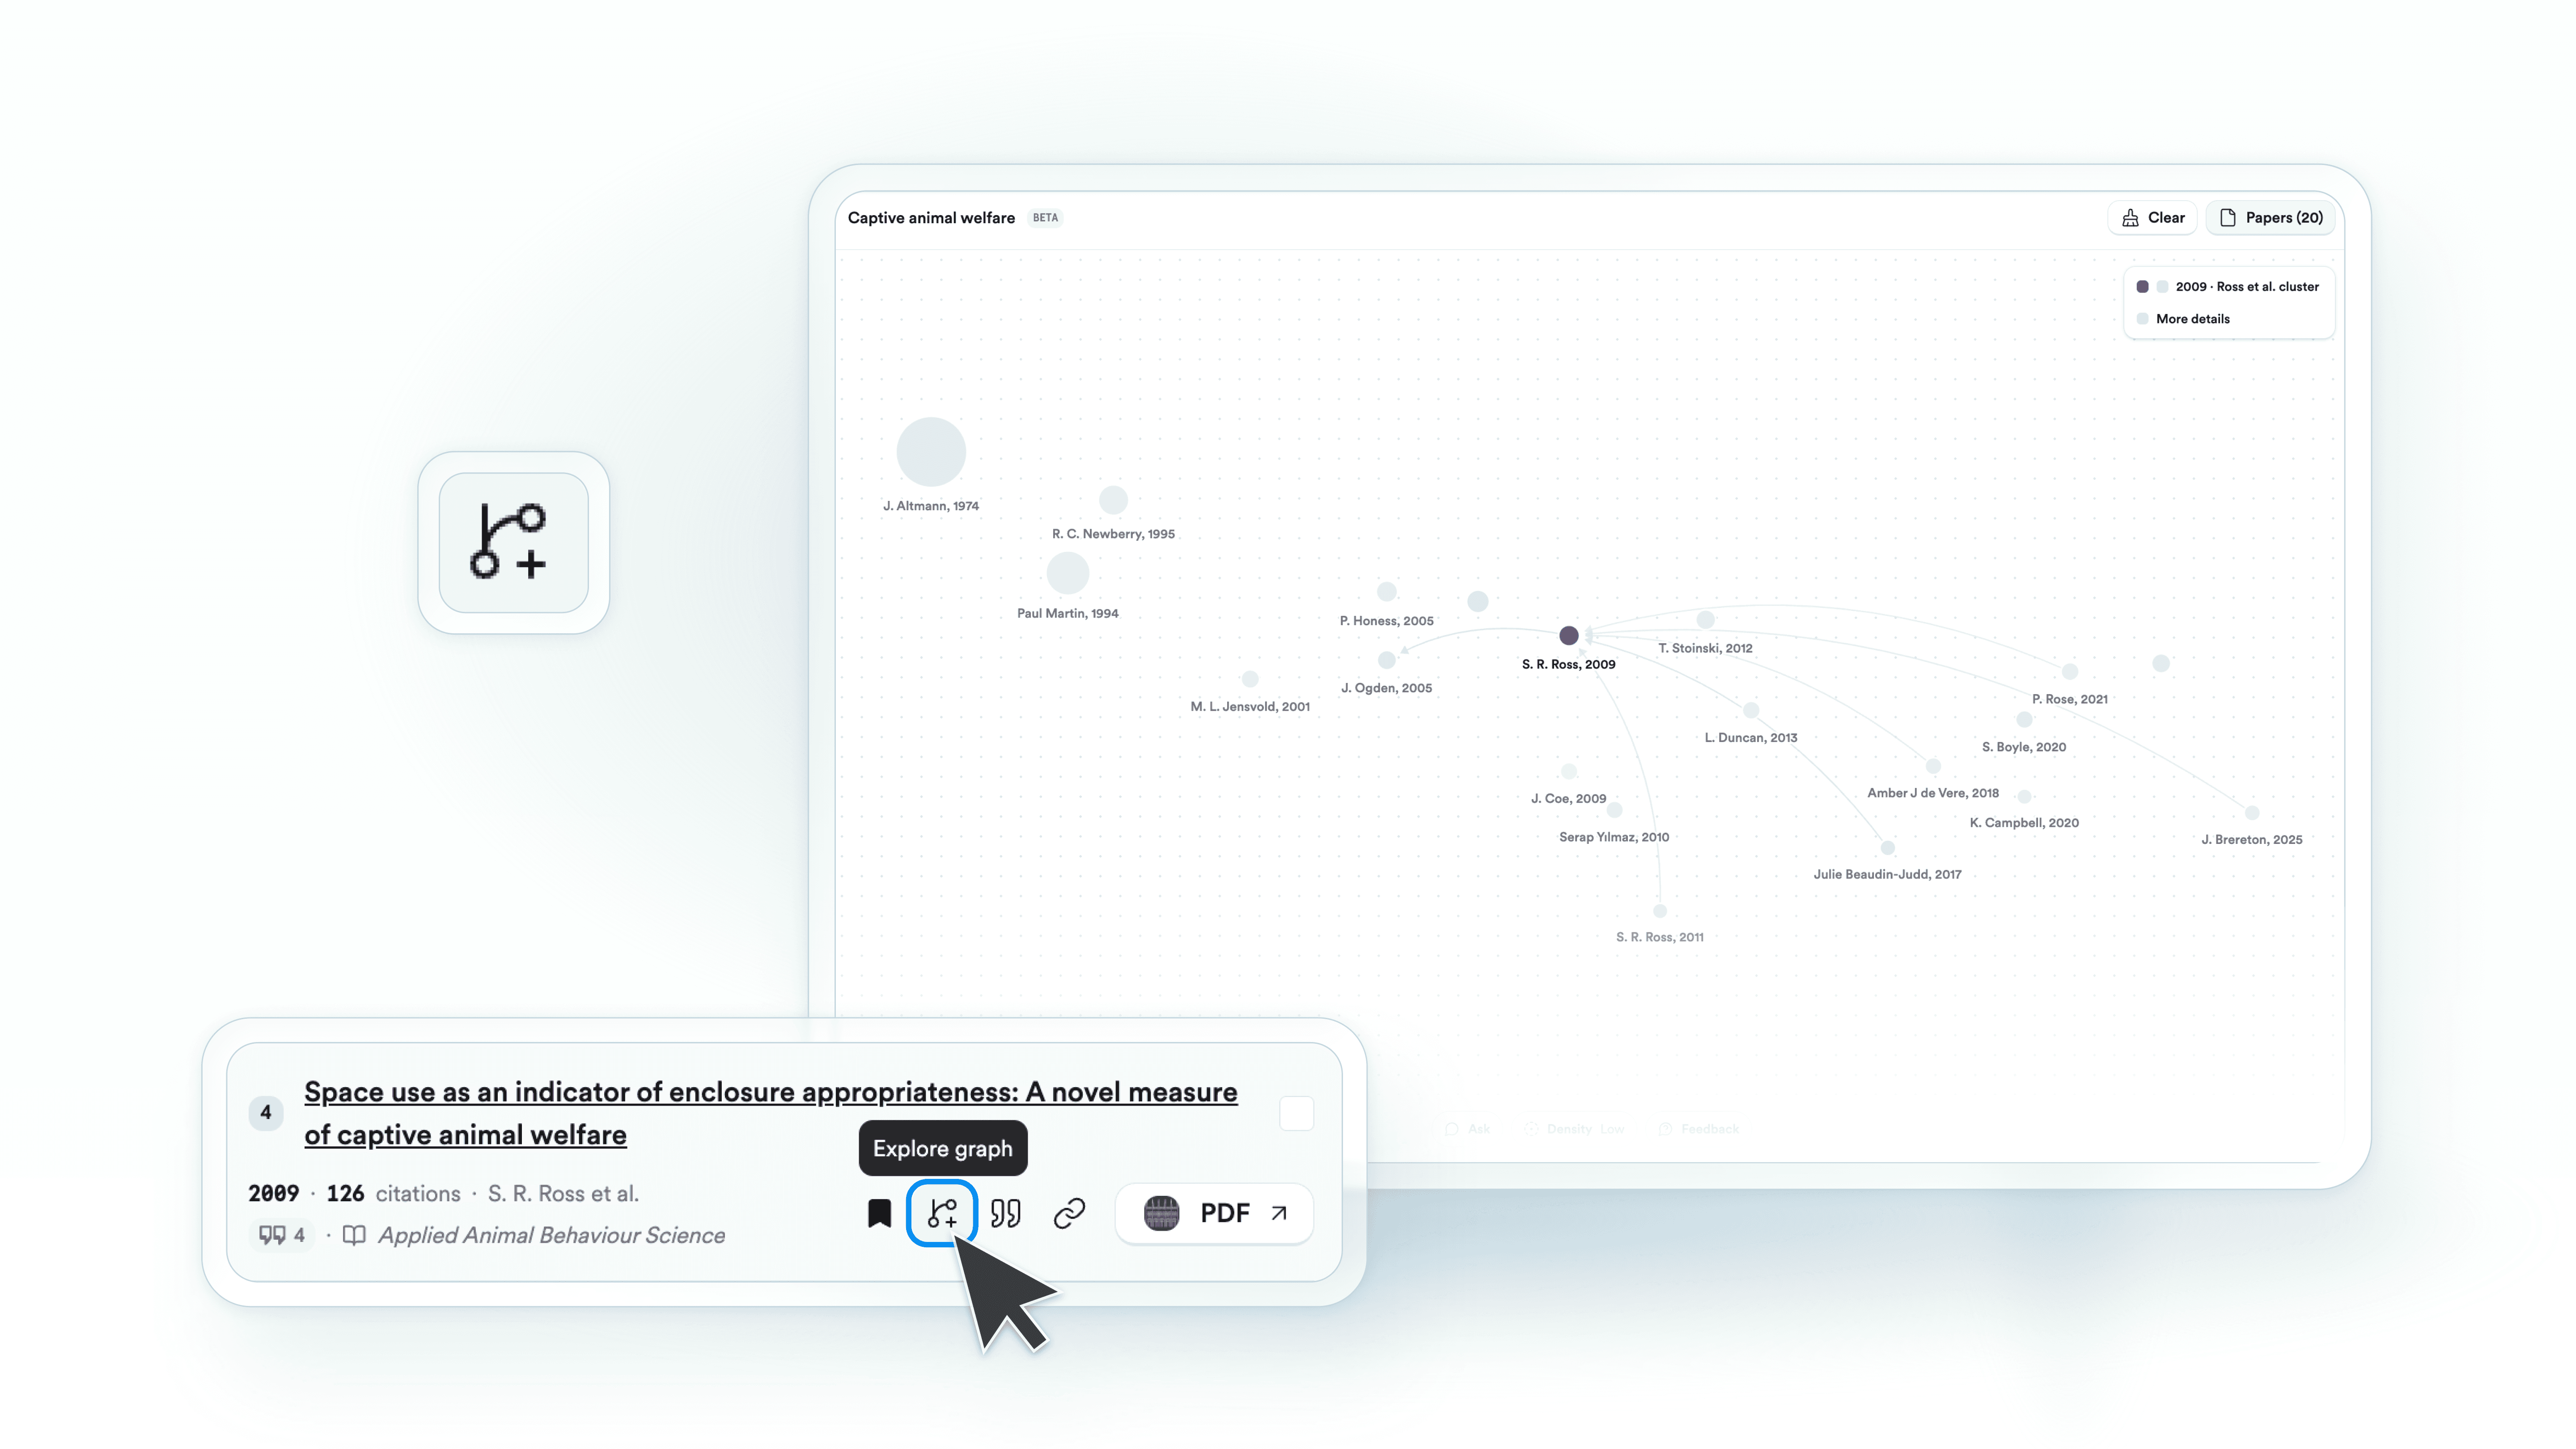
Citation Graph opens from an individual paper rather than through Collection Chat. Save what you find to the appropriate Collection so it feeds later comparisons.
Turn a process into a flowchart
For a complicated process, mechanism, pathway, or sequence, ask Consensus to create a flowchart.
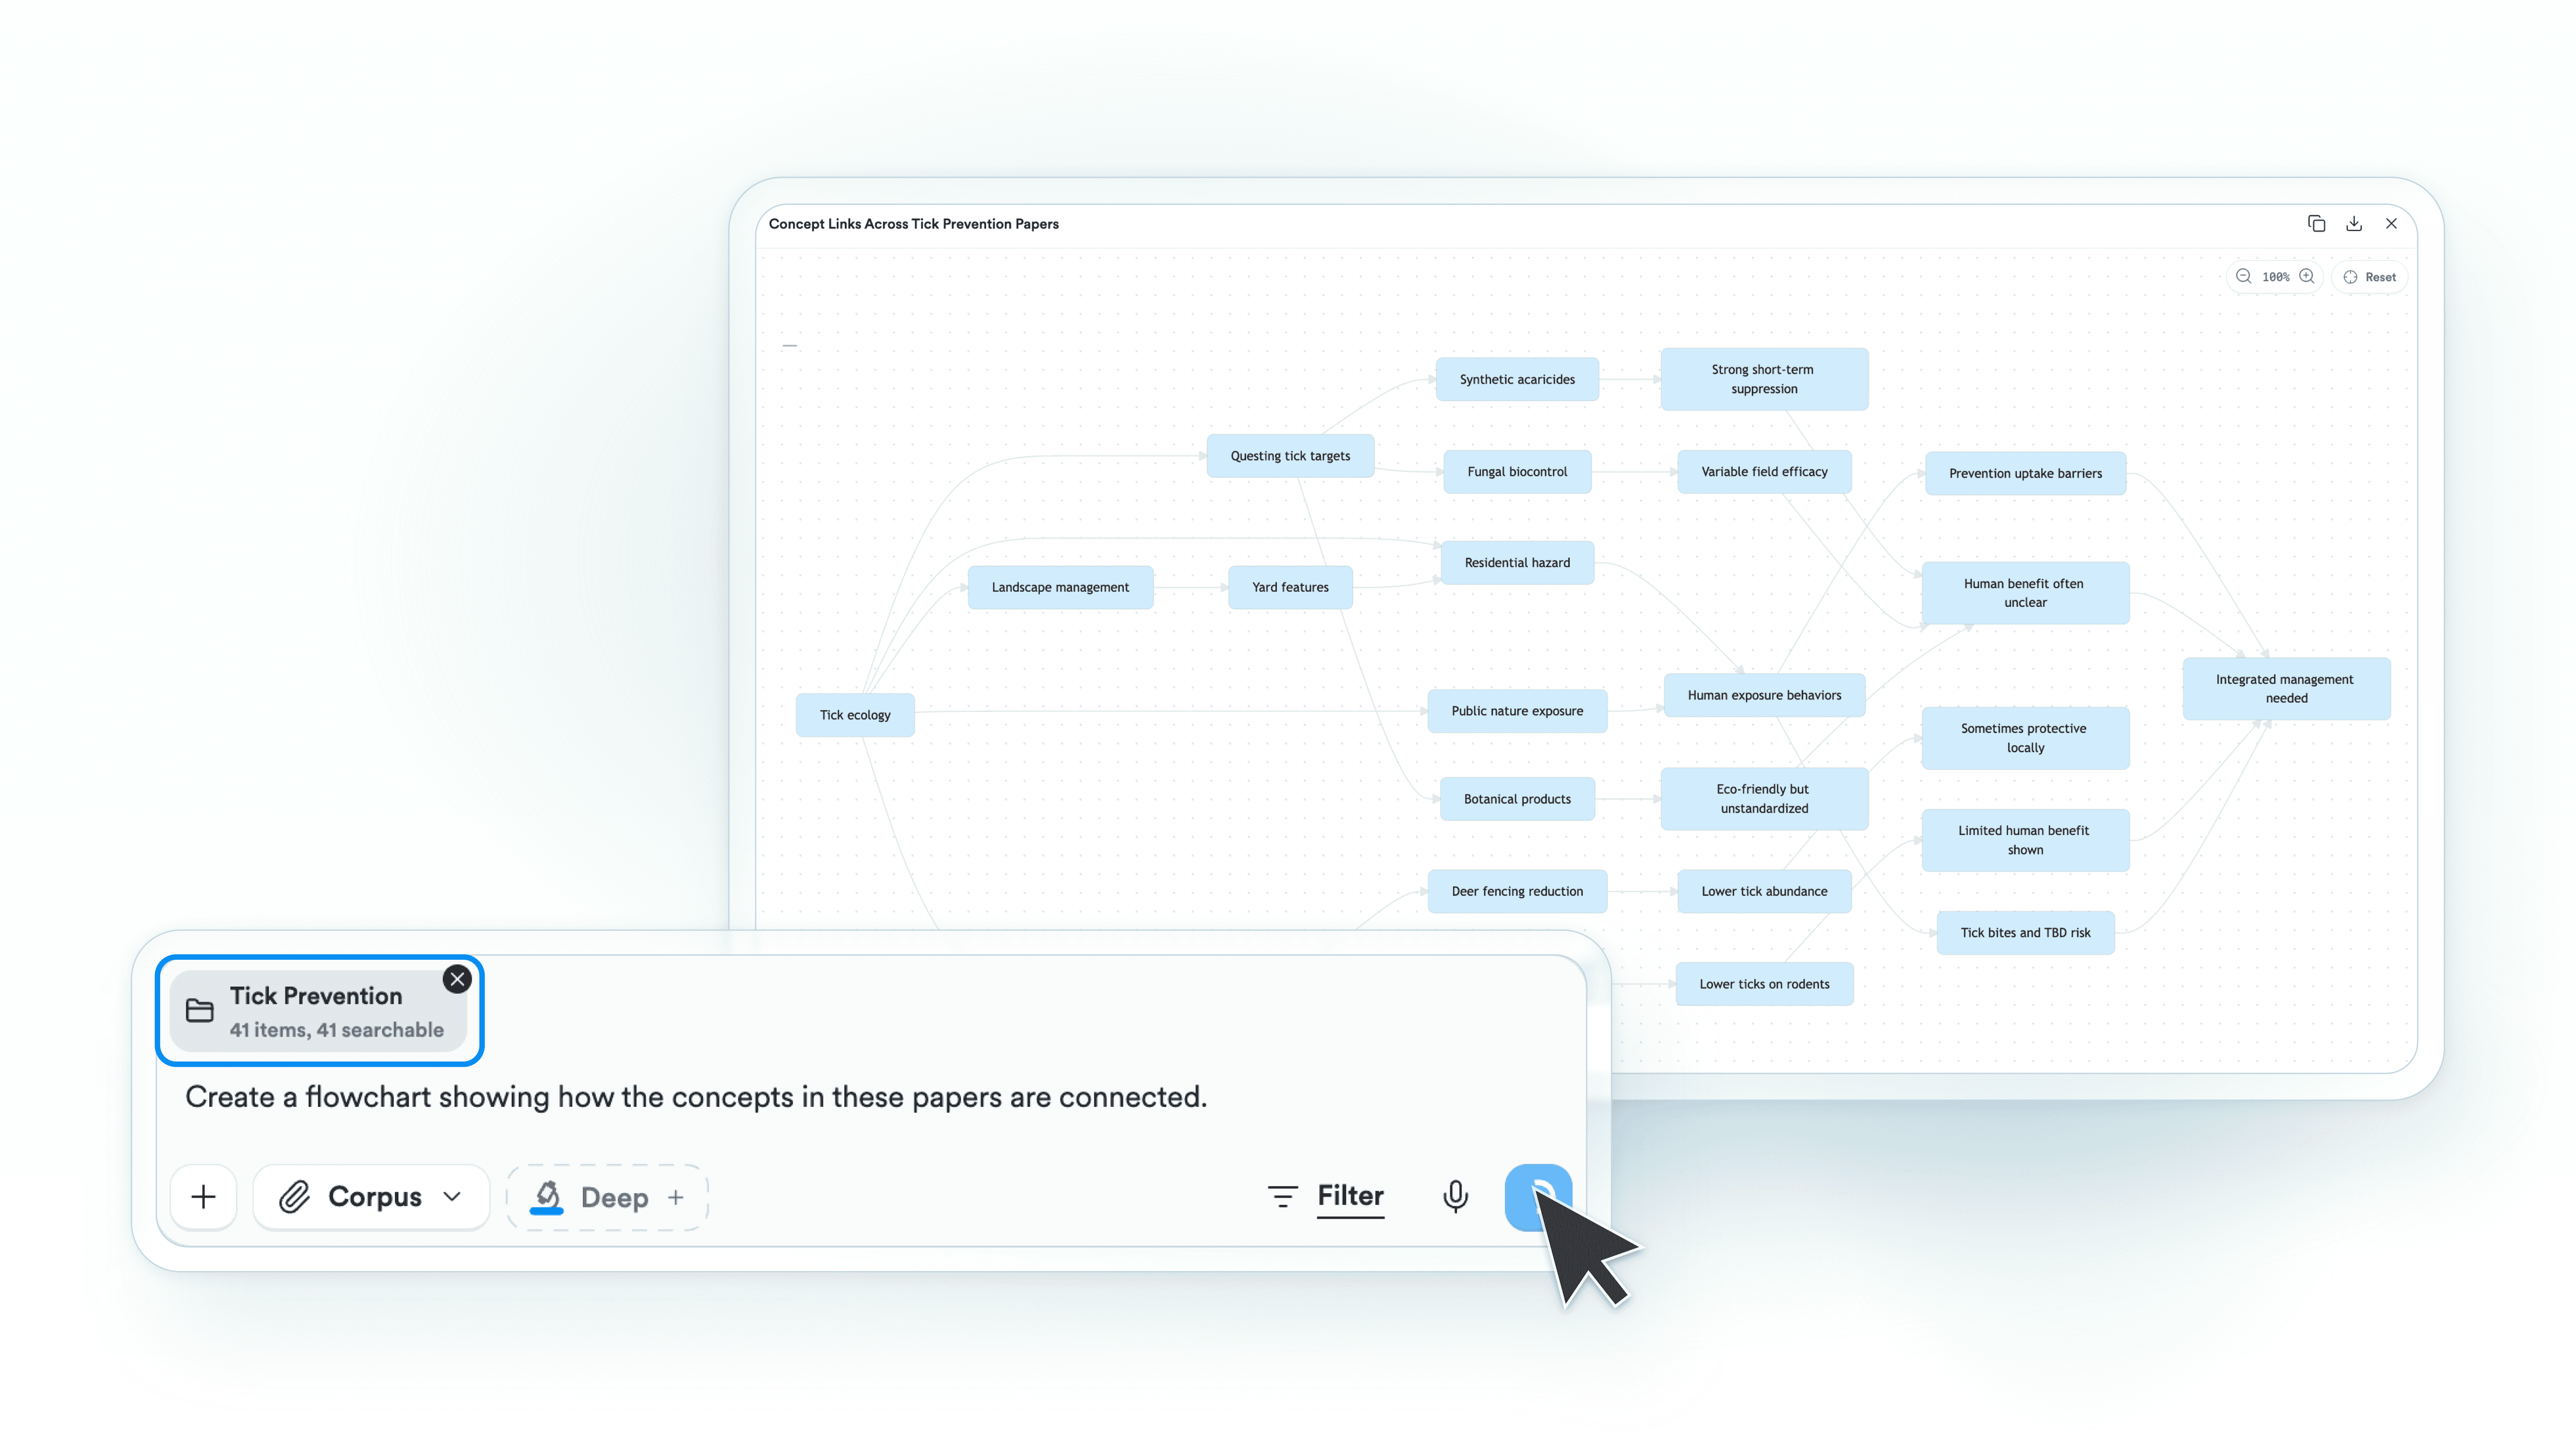
For example:
“Create a flowchart showing how the concepts in these papers are connected.”
Flowcharts work well for theoretical models, biological mechanisms, clinical pathways, research procedures, and other topics with multiple stages or branches.
🔎 5. Work backward from a claim
My Library also helps when you remember an idea but not the paper behind it, or when you need to check whether your sources actually support what you wrote.

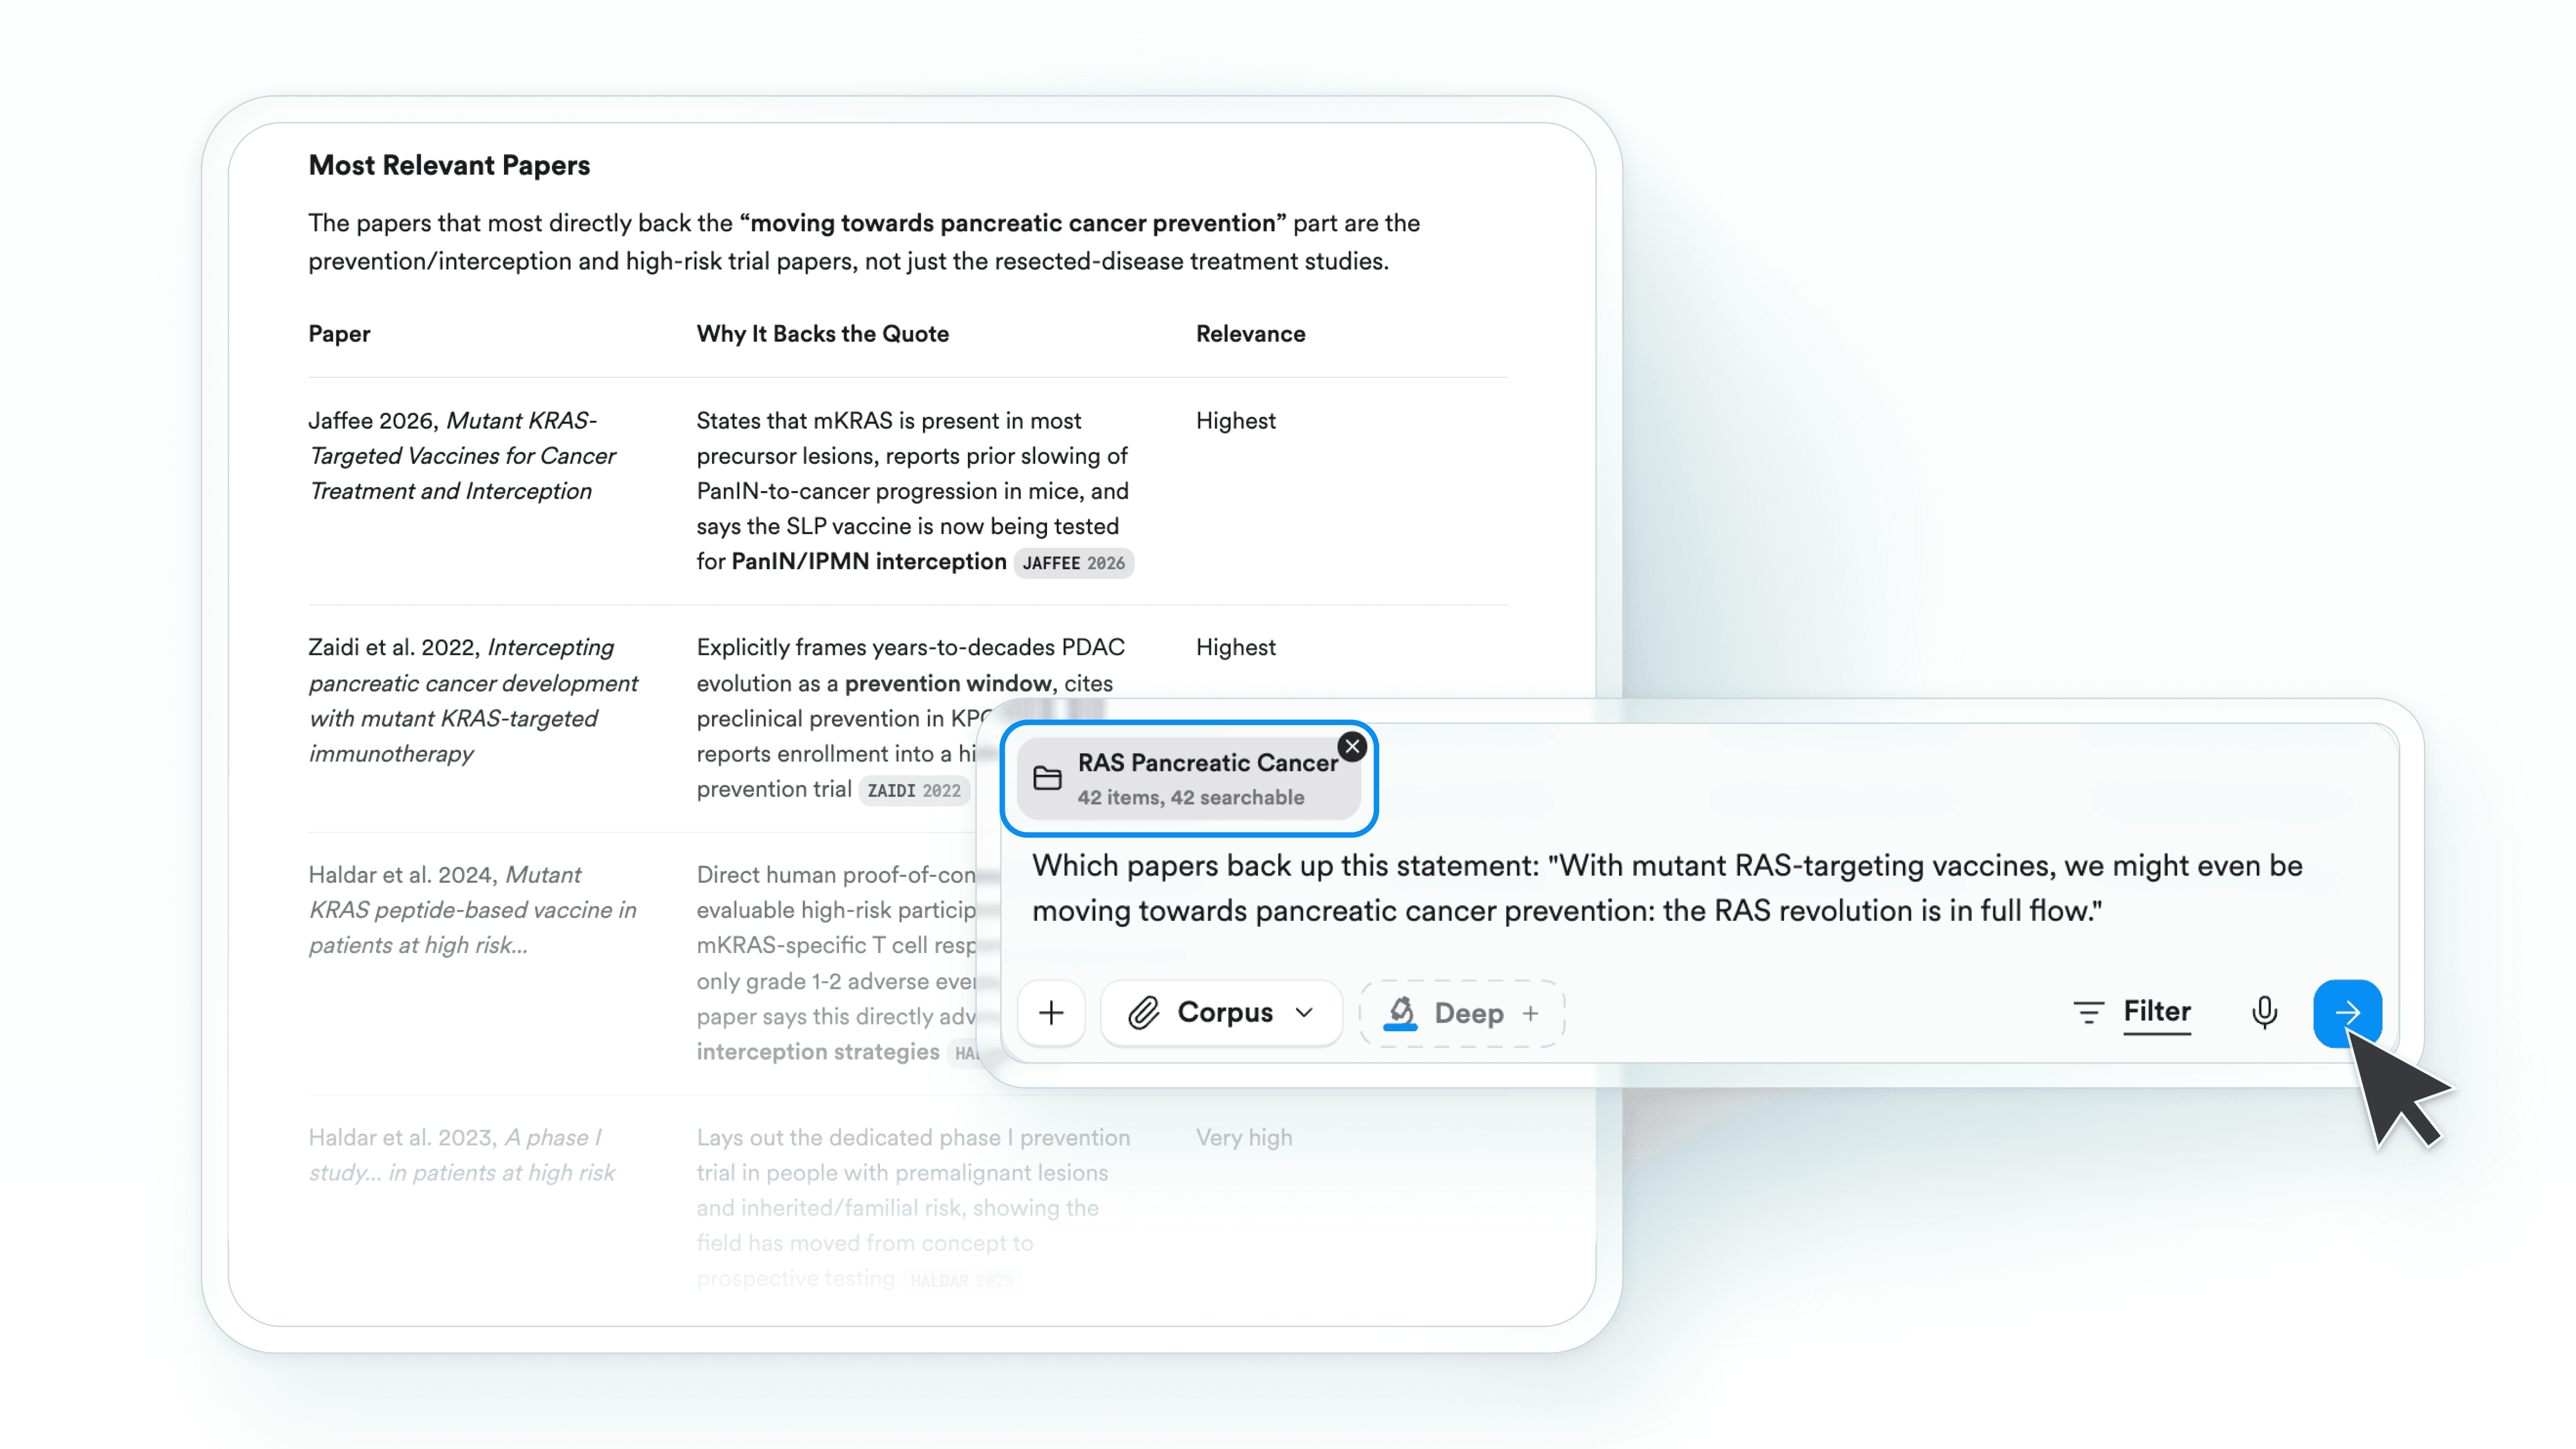
Open the relevant Collection and paste a claim, paragraph, or draft section into Chat. Ask which papers:
Directly support the claim
Qualify its scope
Present contradictory evidence
Examine a different population, exposure, or outcome
Try asking:
“Which papers in this Collection best support these claims and why?”
“Find evidence in my Collection for the following paragraph.”
“Which sources challenge this argument and why?”
“Where does my wording imply causation when the evidence is correlational?”
Consensus can point you to relevant passages and flag statements that need narrowing or qualification.
This reverse-citation workflow connects your writing to papers you have already reviewed instead of sending you back through PDFs and notes. Always open the suggested sources and confirm that the evidence matches your exact wording before you cite it.
✍️ 6. Return to your Collection while writing
Your Collection keeps working once drafting begins.
Upload a PDF of a paper, chapter, proposal, manuscript, or research plan and analyze it against the sources in your Collection. Select the document together with the relevant Collection or papers, then ask Consensus to:
Review the draft claim by claim
Identify supported, partially supported, unsupported, or contradicted statements
Flag causal claims resting on correlational evidence
Surface missing citations and relevant papers
Identify counterevidence and alternative explanations
Suggest where conclusions should be narrowed or qualified
Anticipate questions an adviser or reviewer might raise
Treat the response as a revision checklist, not a set of automatic edits. Open the cited sources, verify the evidence, and decide which critiques warrant changes.
When the review exposes a weakness in your source set, use Deep Search to find the missing evidence and save the strongest papers back to the Collection.
The result is a repeatable loop:

🤝 7. Share your Collection
Once your Collection is organized, share it with classmates, advisers, professors, or collaborators.
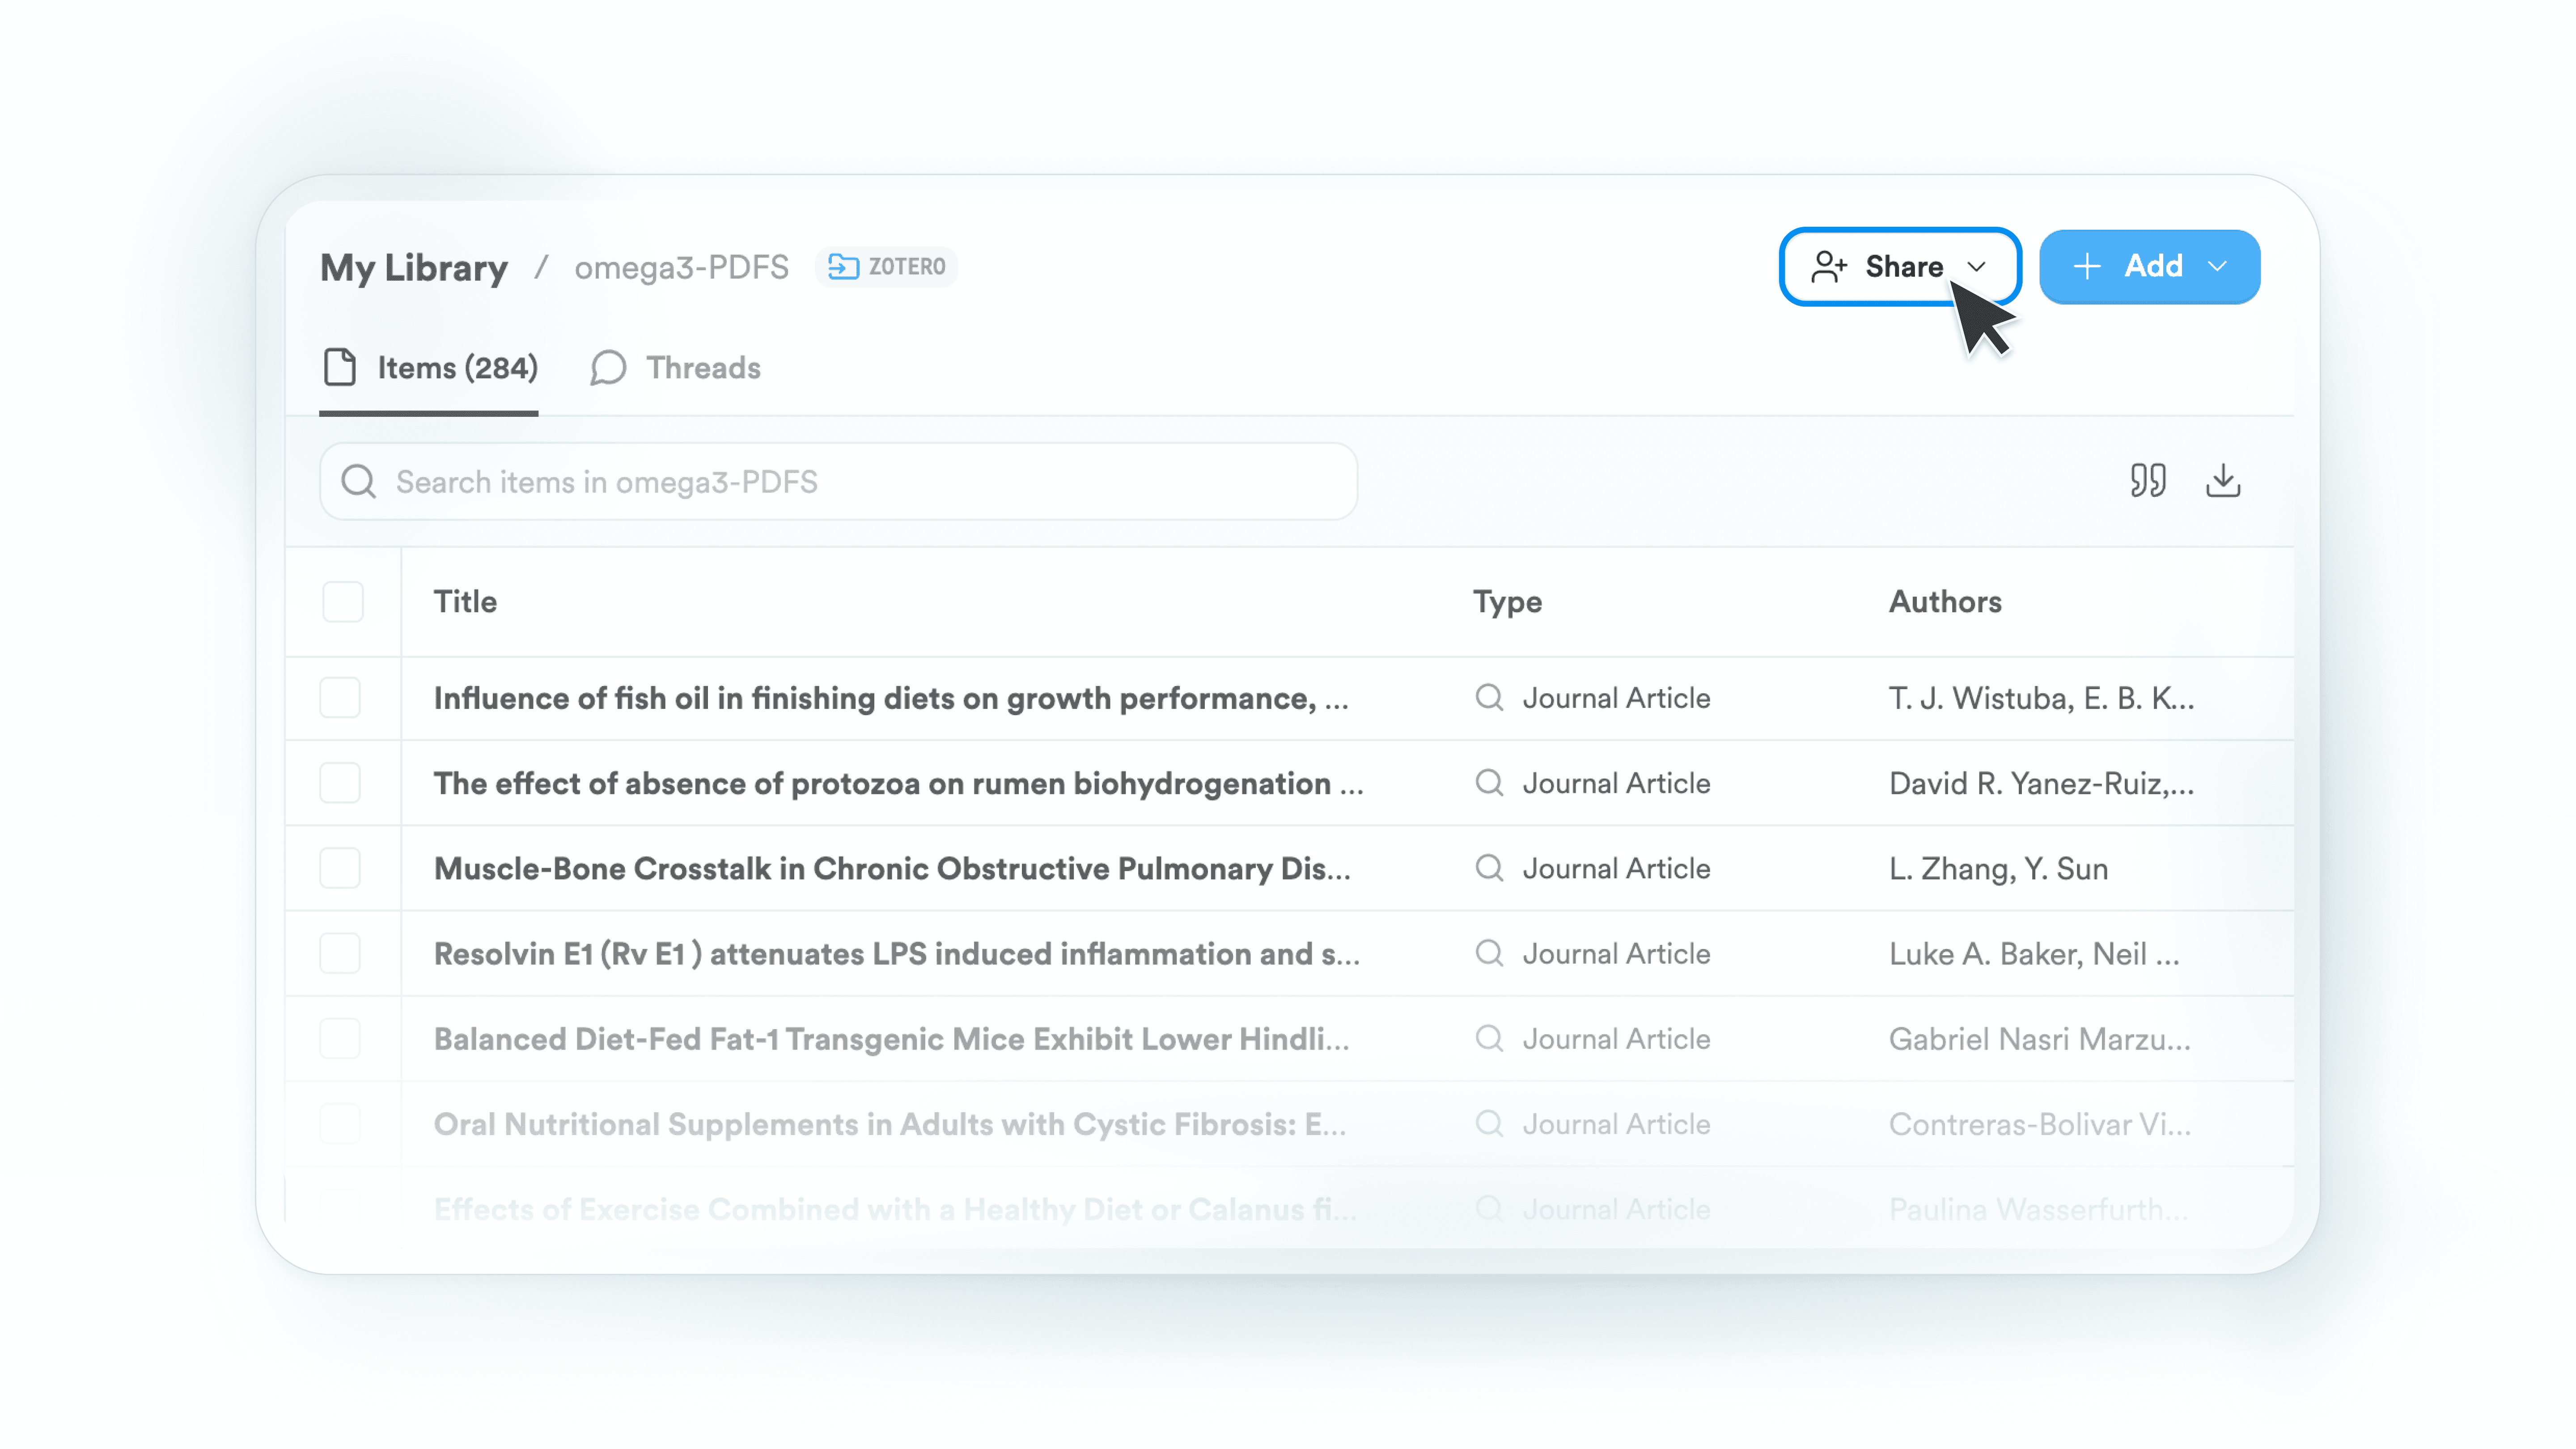
To share a Collection:
Open My Library.
Select the Collection you want to share.
Click Share in the upper-right corner.
Enter the email addresses of the people you want to invite.
Choose a role for each person:
Viewer: can see the papers and subcollections and search across them
Editor: can also add or remove papers and help organize the Collection
Click Send invite.
You can also copy the Collection’s invite link and send it directly. Collections shared with you appear under Shared with me in My Library.
Shared Collections work well for:
Reading lists for a class or research group
Sources for a group assignment
Literature you want an adviser to review
Papers behind a collaborative manuscript or grant
Keeping everyone on the same body of research
If a Collection contains uploaded documents, review its contents before sharing. Invited collaborators can access those files too.
📤 8. Move your research into your writing workflow
Generate a bibliography
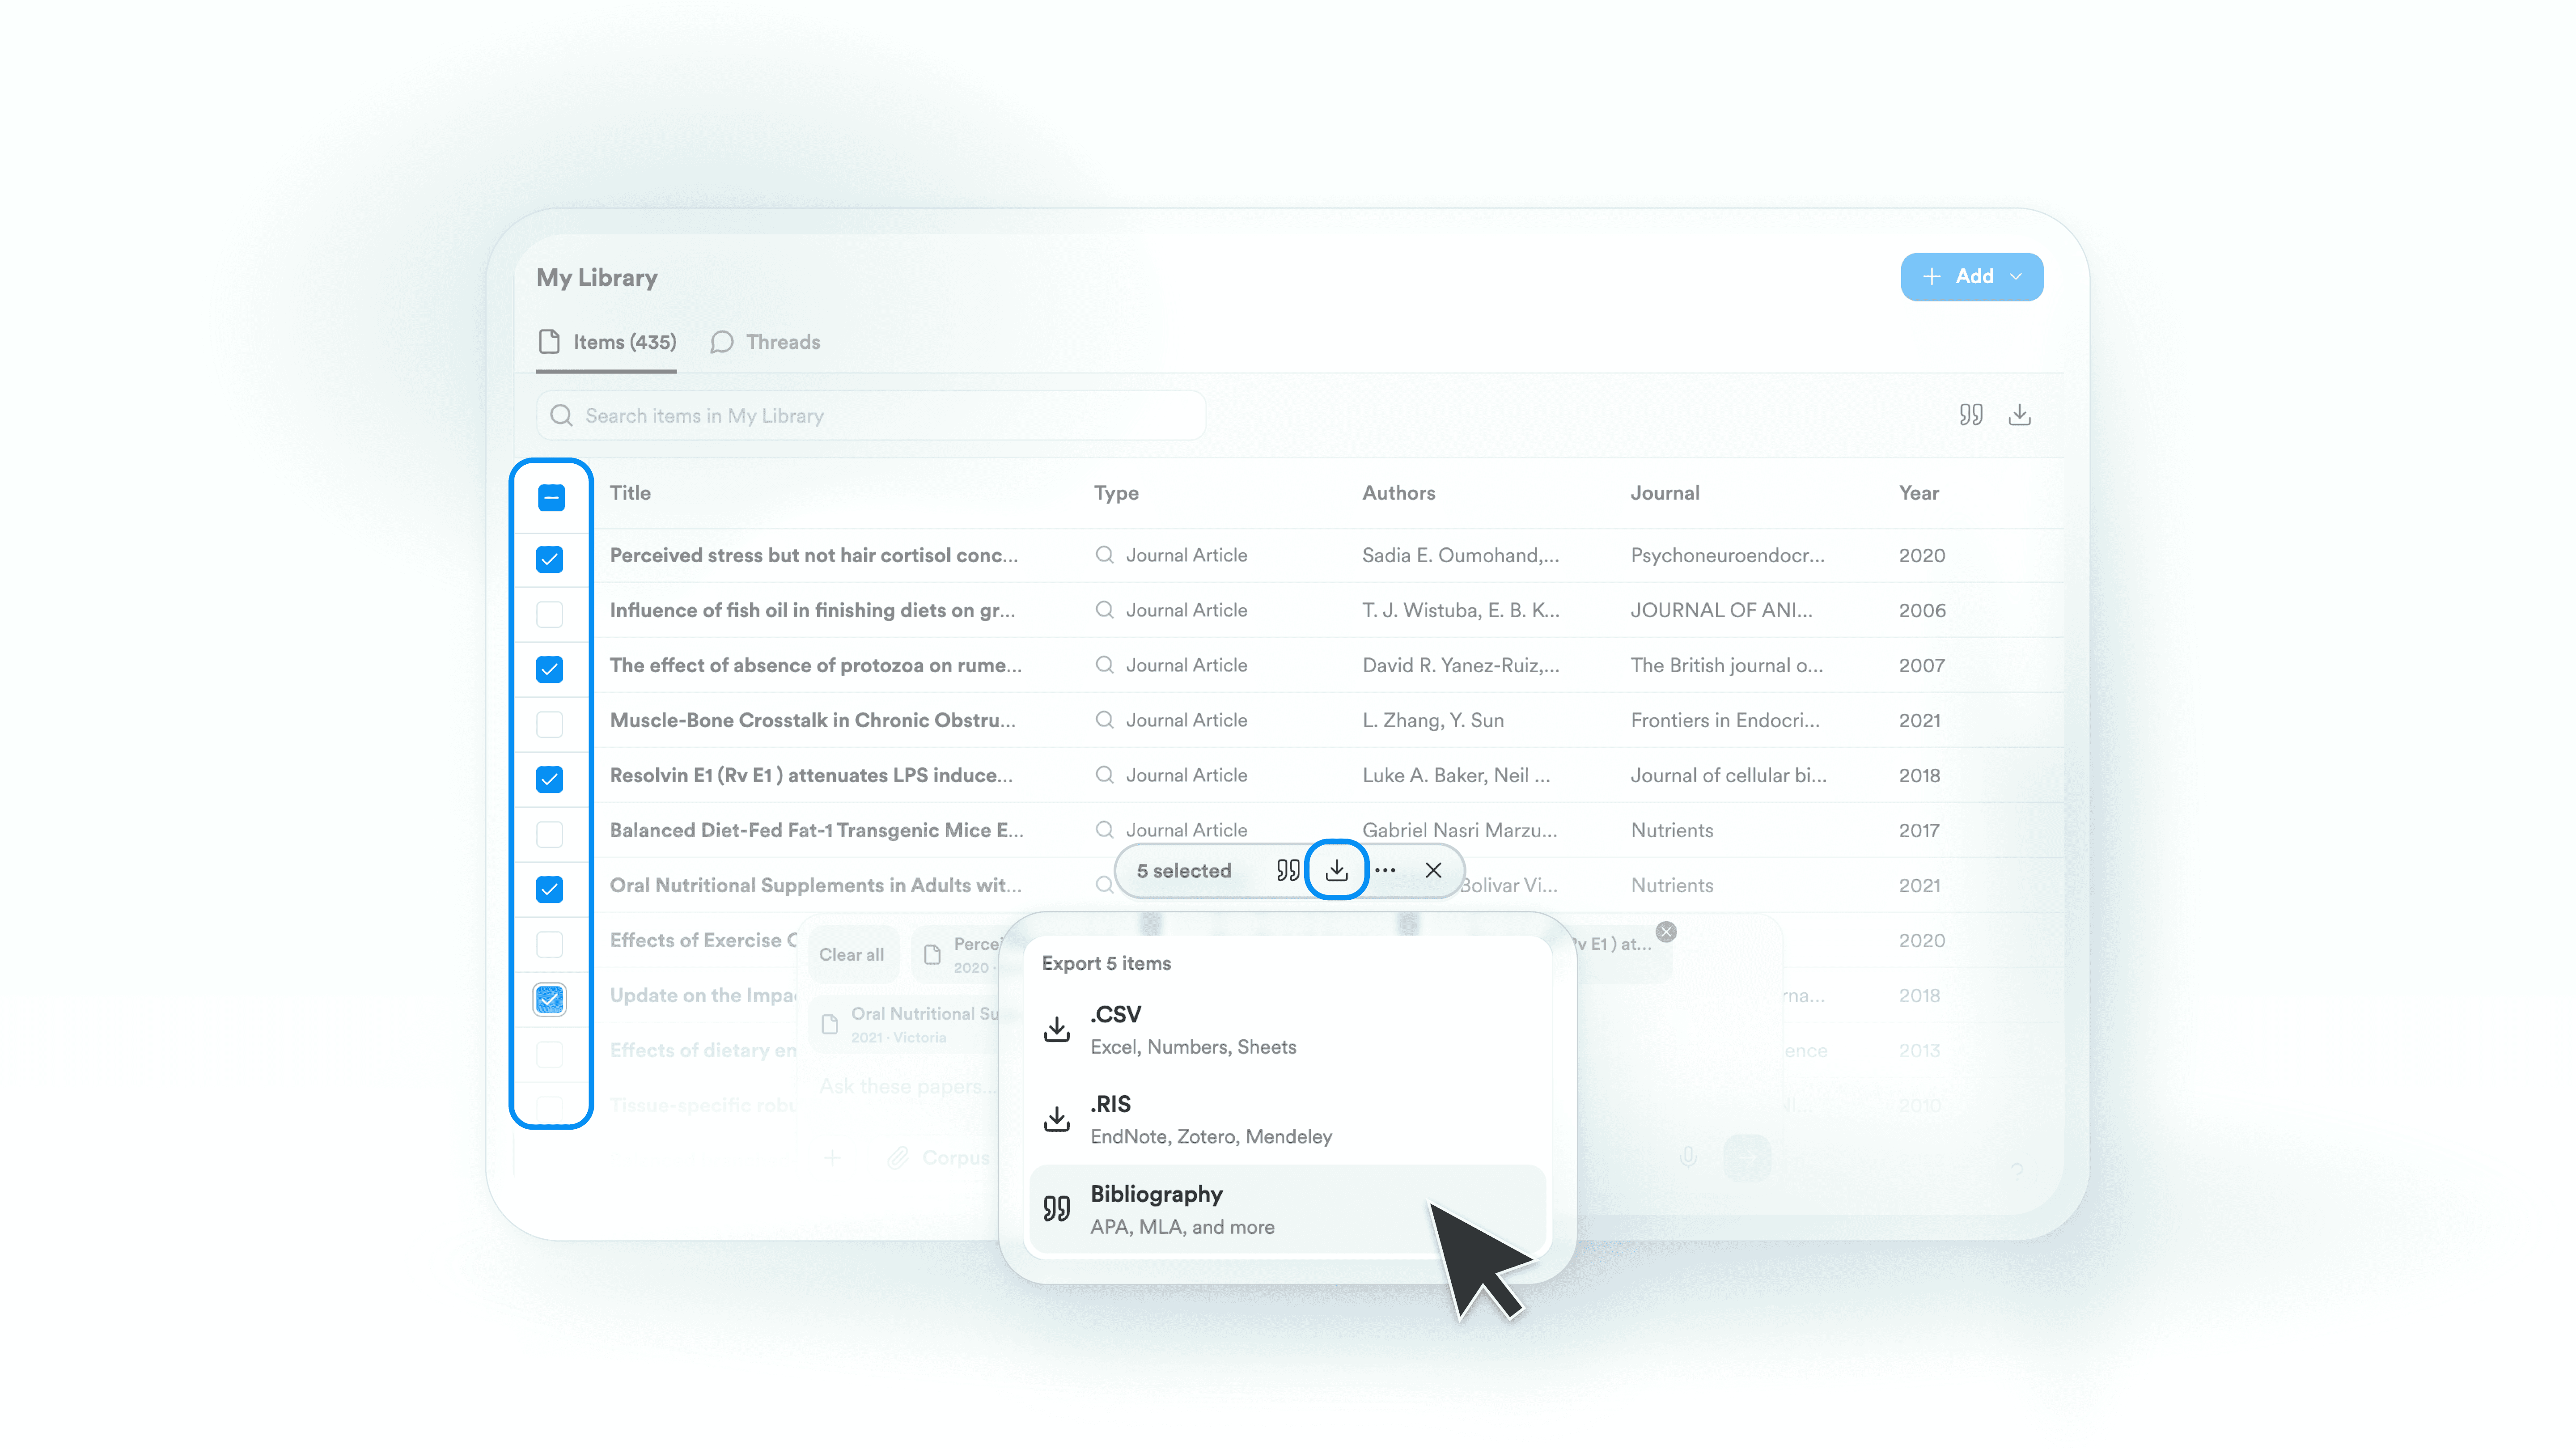
Open the relevant Collection.
Select the papers you want to include.
Click the download arrow above the search bar.
Select Bibliography.
Choose APA, MLA, Chicago, Harvard, LaTeX, or AMA/Numeric format.
Review the generated references before they go into your final document.
Export papers for another research tool
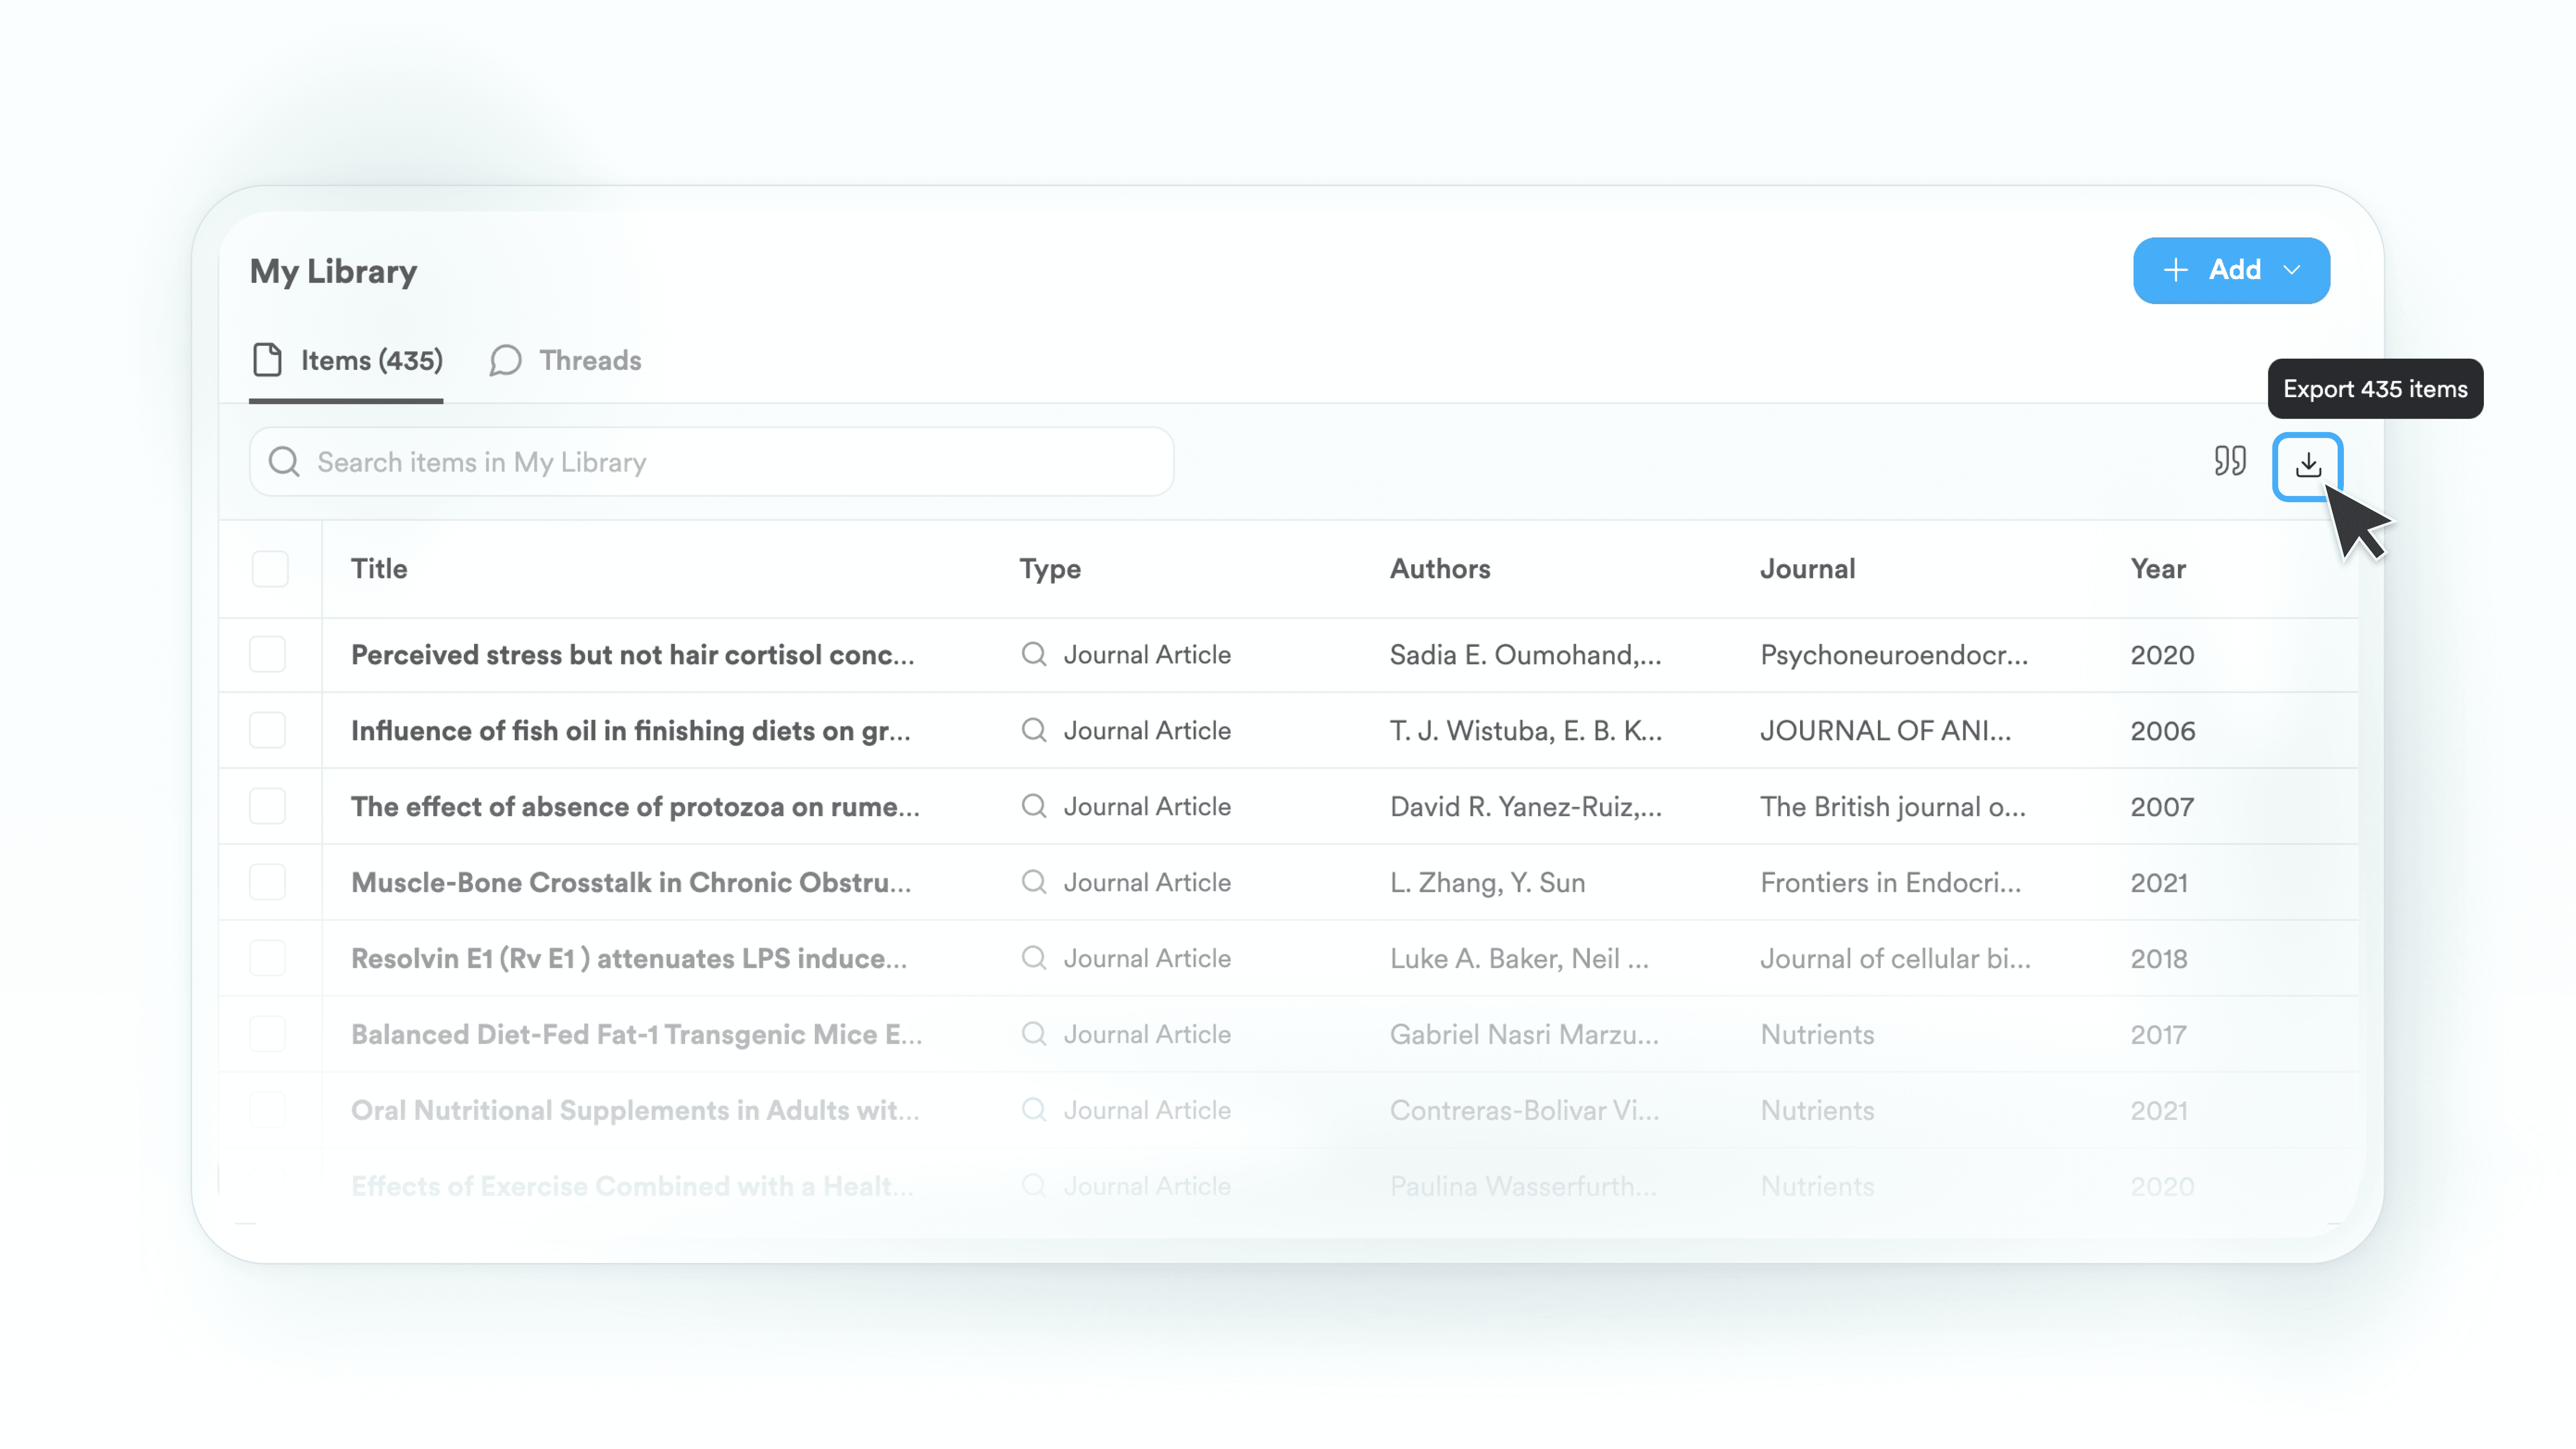
Open your entire Library or select a specific Collection.
Click the download arrow.
Choose RIS or CSV.
Exporting from the main Library view includes everything. Exporting from inside a Collection includes only that Collection’s papers.
To export a single analysis, scroll to the bottom of the response and select Export → Copy with citations. Choose LaTeX to paste into Overleaf or another LaTeX editor.
Copy or export an analysis with its citations
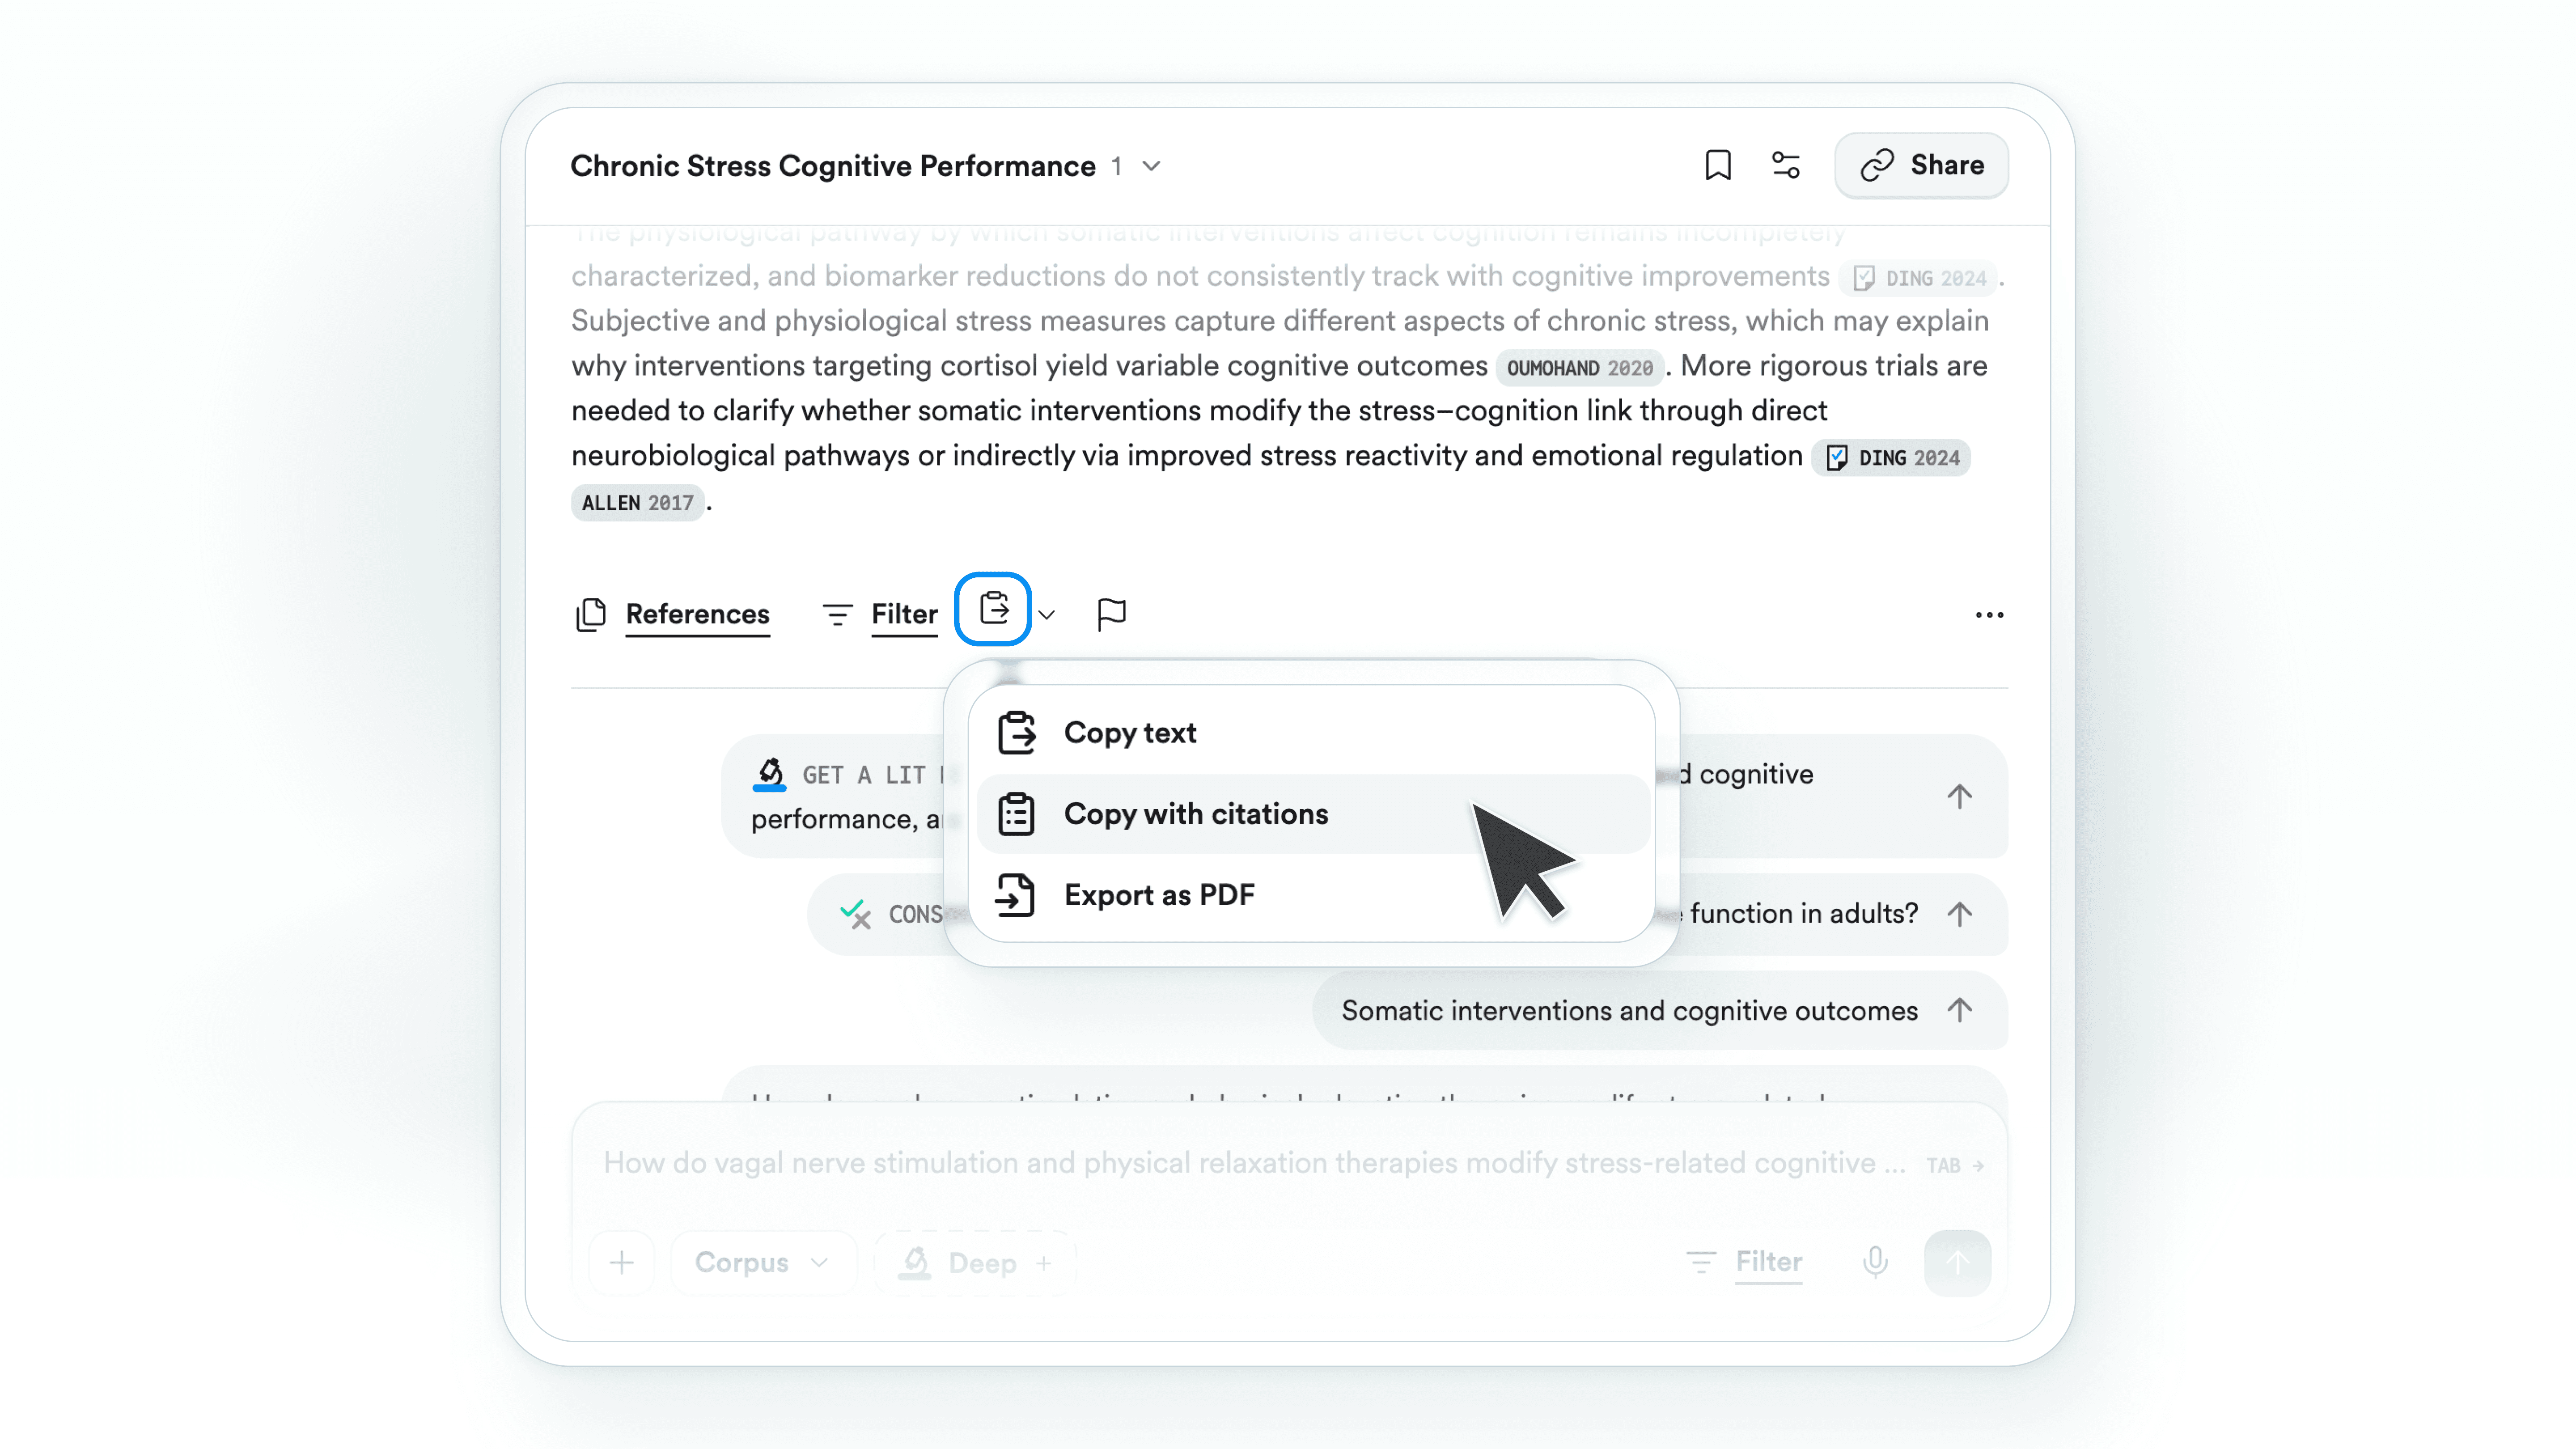
Scroll to the bottom of the generated analysis.
Select the Export icon, then Copy with citations.
Choose the format that fits your writing workflow.
Select LaTeX if you want to paste the analysis into Overleaf or another LaTeX editor.
🌱 Build a workspace you can return to
My Library connects the stages of research that usually scatter across separate tools:
Set up → organize → analyze → visualize → investigate → write → share → return
Start with one Collection for the project in front of you. Add papers as you find them, use Chat to understand the evidence, and come back whenever you need to recover your thinking or decide what happens next.
Become a Consensus MCP expert.
For courses and more information on how to use the MCP, check out our guide below.